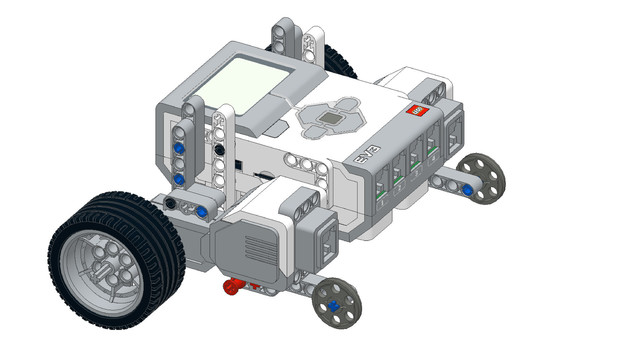
Ще научим как да свързваме и да откачваме LEGO кабелите и в кои мотори трябва да свързваме двигателите.
- #355
- 04 Feb 2017
- 3:53
Кабелът се използва да свърже брика с моторите. В бъдеще ще свързвате и сензорите си със същите кабели.
Кабелите пренасят електрически ток и електрически сигнали от брика, който управлява моторите и сензорите.
Как да свързваме и откачваме кабелите правилно
Винаги трябва да чувате щракащия звук, когато вкарвате кабел в порт. По този начин кабелът е стабилно закрепен в порта и няма начин да се измъкне от самосебе си.
За да откачите кабел, просто натиснете леко прозрачното пластмасово лостче на жака, който стърчи от порта.
За дължината на кабелите
Има три вида кабели по дължина. В различните ситуации най-подходящ е различен кабел и вие трябва да съобразявате това. Използвайте къс кабел, когато моторът или сензорът са близо до брика, или среден/дълъг кабел в останалите случаи.
Портове по подразбиране
Винаги зачитайте портовете по подразбиране за всеки вид мотор и за всеки сензор. Големите двигатели се свързват в портове В и С.
English
The Lego Mindstorms EV3 comes with a number of different cables that are used to connect the brick to the motors and to the other sensors. And in this video we'll look at some of the features of the cables.
First, after you have your robot constructed the first EasyBot robot, you have a construction that looks like this and now to make it work you must connect the motors to the brick. If you have sensors you may also connect the sensors to the brick. But there must be some kind of a connection between the brick, the motors, the sensors, and you make this connection with a cable. You have a port on the brick and you add the cable to the port. And when you push on the cable you can hear a small click. And it's very important to hear this, so that you have a good contact between the port and the cable. Then when you remove the cable just don't pull on the cable because it's locked. And you must press right here
and then you can easily remove the cable. Again, push with click and then remove in this way. And this is the same place for the other end of the cable. So, I'll connect the cable to the brick and now I have a motor and I'll just add the other end of the cable to the motor. It's a very common mistake not to push the cable and it won't click and from there you don't have a good contact and from there your program is not working because the brick can't communicate with the motor. And you also have different cables with different length. You can see this cable and it's longer than the previous one.
So, always try to use the cables with appropriate length. For example, if you just have to connect the motor to the brick and the motor is not that far away from the brick you can use the shortest cable and you can save the longest cable for some of the attachments. That's the basic thing about the cables. You have four different ports on which you can connect the motors. And you can connect the motor on port A and on port D. Or you can connect them on A and B, or on C and D. You can connect them in a number of different ways. There's a default way that we in the course are going to use and that most of the Lego communities are using and even the software is using this default connection. You always have the left motor connected on port B and you always have the right motor connected on port C. That's not an requirement that's a convention and that's an easy way to communicate and to be faster in the course. Just to have a default connection so that we can know that the motors are always connected on port B and port C.
Курсове и занятия включващи този Урок
Този Урок е използван в следните курсове и занятия.
EV3 Phi. Introduction to robotics with LEGO Mindstorms
The things that you will be able to do with your EV3 robot by the end of this course are:
Freely move your robot towards desired target;
Avoid obstacles on the path of your robot using sensors;
Follow lines of any shape;
Detecting and picking up objects of any kind;
- 92
- 220:20
- 36

First challenge - Yo Yo task
Да разгледаме какво ще се случи в днешното занятие.
- 14
- 0
- 4
- 3d_rotation 0

Instructors Remote Training
If you are working with students and you want to introduce Robotics to your class or you want to mentor a FLL team, but you are insecure about your technical knowledge in the Robotics field, then this is the right place for you. Having in mind teachers' busy schedule, we have design two different schedules and added an option to design one just for you. FLLCasts's Mindstorms EV3 Robotics Online Training is the perfect match for any teacher.
After the completion of each task the participant has to upload his solution for verification.
- 136
- 280:11
- 156
How to make the robot move
Нека да разгледаме брика - LEGO Mindstorms EV3 Intelligent Brick. Умната LEGO тухличка.
EV3 брикът е главният компютър на вашия робот. Той има екран, бутони и различни портове.
- 24
- 0
- 11
- 3d_rotation 0

Роботика с LEGO - Ниво 1.0 - Приключение в Космоса
Първото ниво от учебната програма по LEGO роботика за ученици от пети до дванадесети клас.
В нивото се изграждат различни конструкции на роботи. Управляват се моторите така, че роботите да извършват прецизни завои около „земята“ и „луната“. Преодоляваме различни препятствия след като се блъснем в тях благодарение на сензора за допир.
С помощта на сензора за разстояние роботът се движи без да се блъска в заобикалящите го препятствия. Достигаме до понятията цикъл, градуси, среден мотор. Накрая роботите могат да изпълняват едновременно две различни неща - докато изпълняват мисии върху специално изградено поле, третият двигател разчиства засечени обекти.
- 126
- 123:52
- 150
Коригиране и довършване на конструкцията
Ще ви покажем какви са типичните проблеми, които правят учениците, когато строят робот.
- 7
- 0
- 6
- 3d_rotation 0
Забавното ниво - въведение в LEGO роботиката чрез игри
Това ниво цели да въведе учениците ни в света на LEGO роботиката, използвайки игри. В занятията използваме предизвикателства и мисии с цел учениците да искат да ги преминат. Така те усвояват знанията, защото са им нужни за да съживят роботите си.
Част от игрите включени в курса са футбол, боулинг и изстрелване на хартиен самолет. Нивото работи с ученици от 8 до 12 години и дори по-големи, които също ще се забавляват с игрите с роботи.
- 50
- 58:06
- 32
Занятие 1 - Въведение
Подходът ни в този и в следващите курсове ще е следният: поставяме една голяма задача, която задава посоката на занятието, и работим само по нея.
- 35
- 0
- 7
- 3d_rotation 1

Ниво A - Въведение - Роботика с LEGO
Първото ниво от учебната програма по LEGO роботика за ученици от втори, трети и четвърти клас.
Едно, “пътешествие из космоса”, но с роботи. В нивото се изграждат различни конструкции на роботи. Управляват се моторите така, че роботите да извършват прецизни движения около „земята“, „луната“ и „слънцето”. Преодоляваме различни препятствия след като се блъснем в тях благодарение на сензора за допир. Изграждаме и програмираме роботи, които могат да се сражават и защитават стига това да се наложи.
- 142
- 133:42
- 187
Коригиране и довършване на конструкцията
Ще ви покажем какви са типичните проблеми, които правят учениците, когато строят робот.
- 7
- 0
- 6
- 3d_rotation 0