Какво е разрешено и какво не при построяване на робота без инструкции.
- #432
- 03 May 2017
- 2:59
- LEGO MINDSTORMS, LEGO MINDSTORMS EV3
- Teacher's Note, Methodology, EV3, Construction, Classes with students
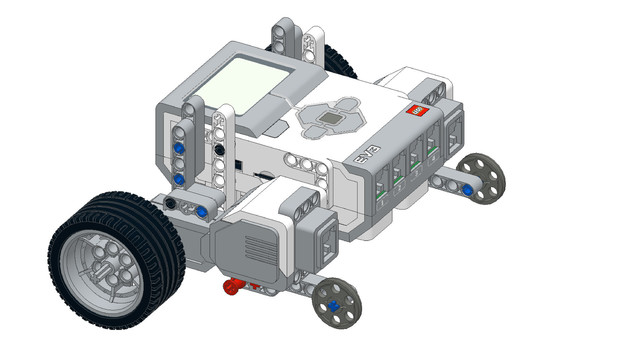
Използвайте греди
Обикновено учениците предпочитат да използват оси, когато строят роботите си. Покажете им алтернатива – покажете им как да строят с греди.
Позициониране на сензора
Оставете учениците да строят, както пожелаят. Сензорът може да бъде поставен навсякъде върху робота, стига да сочи напред и да е извън рамката на робота.
English
A few notes for the teacher on how based on our experience of course most of the students will add this sensor to the front of the robot. Few things to note here. First, when they have this task most of the students will try to extend the construction with axles either with a gray one or a black one because it's easy to do this with an axle but a more durable way is to use beams. Don't stop them but just have in mind that the students that are starting with an axle will probably at the end have a construction not that durable or it will take them more time to add the touch sensor to the front of the robot. The other thing is that you can add the sensors at different places at the front of the robot. You can even for the next few sessions, for the next few videos you can even add the sensor at the top of the robot. Now, it's preferable if you don't stop the students if the decide to add the sensor at a different position even on the top of the robot. Why? Because that's a part of their imagination and they'll try, they'll come up with different solutions and it's interesting then to discuss this solution. But as a general rule the touch sensor should not be inside the frame of the robot because the idea of the touch sensor is that when you move it can actually touch things at the front. And if the sensor is inside the frame of the robot, it will be the robot first bumping at the wall and the sensor will not be able to bump. If of course you do not extend the sensor but that's a topic for some of the next videos. Probably the most difficult thing that the student will have to solve now, the most difficult task is how to change the direction of the holes of the different beams. So, in this case you can think of the beam as facing up and how do you using some of the parts in the set change this direction with a couple of other beams so that at the end it will face left or right. So, it's horizontal instead of vertical. And this will be something difficult for most of the students but at the end in about 10-15 minutes probably they'll come up with a solution. If you have a student that have accomplished this in a very short time, you can give them a more complex task to make this longer or to make this higher so that they could keep up with the rest of the group.
Курсове и занятия включващи този Урок
Този Урок е използван в следните курсове и занятия.
EV3 Phi. Introduction to robotics with LEGO Mindstorms
The things that you will be able to do with your EV3 robot by the end of this course are:
Freely move your robot towards desired target;
Avoid obstacles on the path of your robot using sensors;
Follow lines of any shape;
Detecting and picking up objects of any kind;
- 92
- 220:20
- 36

Extend the robot with a touch sensor. Building without instructions
Опитайте сами да поставите сензор за допир на робота.
- 2
- 0
- 1
- 3d_rotation 0

Ниво A - Въведение - Роботика с LEGO
Първото ниво от учебната програма по LEGO роботика за ученици от втори, трети и четвърти клас.
Едно, “пътешествие из космоса”, но с роботи. В нивото се изграждат различни конструкции на роботи. Управляват се моторите така, че роботите да извършват прецизни движения около „земята“, „луната“ и „слънцето”. Преодоляваме различни препятствия след като се блъснем в тях благодарение на сензора за допир. Изграждаме и програмираме роботи, които могат да се сражават и защитават стига това да се наложи.
- 142
- 133:42
- 187

Занятие 6 - Сензор за допир
В края на следващото занятие обикновено правим завършване. Напишете впечатленията си за учениците и причините защо сте дали ранга, който сте им поставили.
- 10
- 3
- 6
- 3d_rotation 0

Роботика с LEGO - Ниво 1.0 - Приключение в Космоса
Първото ниво от учебната програма по LEGO роботика за ученици от пети до дванадесети клас.
В нивото се изграждат различни конструкции на роботи. Управляват се моторите така, че роботите да извършват прецизни завои около „земята“ и „луната“. Преодоляваме различни препятствия след като се блъснем в тях благодарение на сензора за допир.
С помощта на сензора за разстояние роботът се движи без да се блъска в заобикалящите го препятствия. Достигаме до понятията цикъл, градуси, среден мотор. Накрая роботите могат да изпълняват едновременно две различни неща - докато изпълняват мисии върху специално изградено поле, третият двигател разчиства засечени обекти.
- 126
- 123:52
- 150

Занятие 4 - В тъмните тунели на Марс; Сензор за допир
Въведение
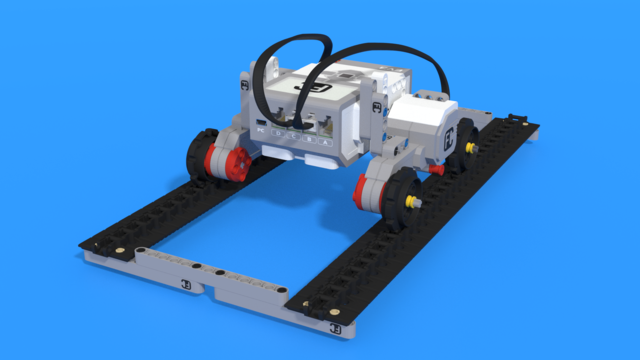
Днес ще правим робот, който да изследва повърхността и пещерите на Марс.
Защо учените се интересуват толкова много от Марс? Какво знаете за тази планета?

Марс е четвъртата планета от слънчевата система, между Земята и Юпитер. Наричан е още "Червената планета" заради червената си атмосфера. Понеже Марс се намира близо до земята, той е на идеалното място да поддържа живот. Точно това занимава много учени, които искат да разберат дали има живот на Марс или поне дали ние можем да направим планетата обитаема. За сега няма конкретни доказателства за нито едното, но Марс продължава да е един от най-изследваните космически обекти. Повърхността на планетата е изградена от скали, което означава че нашият робот трябва да е много стабилен. Задачата ни днес ще бъде да направим робот, който да преминава през пещера-тунел в марианска планина.
- 12
- 3
- 7
- 3d_rotation 1
Python за EV3 LEGO Mindstorms - ниво 2
Във второто ниво по Python за EV3 роботи учениците изучават в дълбочина сензора за допир. Сензорът се разглежда както като средство за ръчно управление на машини, така и като сензор за автономни роботи. В няколко занятия учениците изграждат пулт за управление на хващача и движението на кран. От страна на програмирането учениците изучават конструкциите за разклоняване на код "if-else", условните и безкрайни цикли с "while" и операторът за обръщане на условие "not". В края на нивото роботите могат да усещат препятствия които да избягват и излизат от простичък лабиринт.
- 39
- 19:58
- 93

Занятие 6 - Aвтоматизирана прахосмукачка
Въведение
Днес ще създадете робот, който се държи като автоматизирана прахосмукачка!
Една от най-досадните домашни задължения, които има всеки отговорен възрастен човек е да почиства домa си. Затова инженерите са създали румбата! Не говорим за танцът румба, а за роботизираната домашна прахосмукачка.

- 5
- 4
- 8
- 3d_rotation 1
Python за EV3 LEGO Mindstorms - ниво 2
Във второто ниво по Python за EV3 роботи учениците изучават в дълбочина сензора за допир. Сензорът се разглежда както като средство за ръчно управление на машини, така и като сензор за автономни роботи. В няколко занятия учениците изграждат пулт за управление на хващача и движението на кран. От страна на програмирането учениците изучават конструкциите за разклоняване на код "if-else", условните и безкрайни цикли с "while" и операторът за обръщане на условие "not". В края на нивото роботите могат да усещат препятствия които да избягват и излизат от простичък лабиринт.
- 39
- 19:58
- 93

Занятие 7 - Преминаване през тунел
В случаите, когато учениците не карат модул от две нива наведнъж, днес е последното занятие от нивото.
- 10
- 3
- 8
- 3d_rotation 1