Introduction
Today we will once again construct a tank. The robot will use more parts than the one from the previous lesson and most importantly it will use gear wheels. We will dive into the world of physics and learn more about gears and how to use them.

Construction
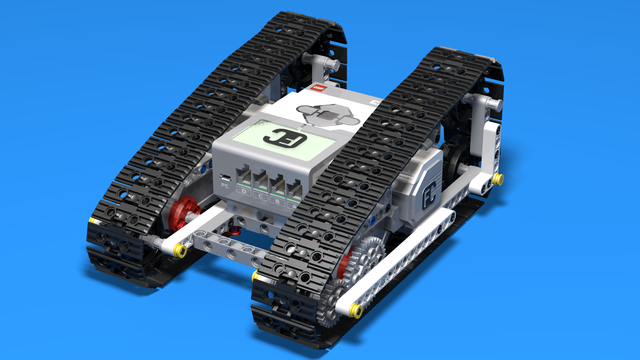
Construct the tank based on the instructions below. Pay attention to the driving system of the tank. Are the treads directly powered by the motors?
Iqazator - EV3 Tank with Treads and the strange look of a racing car
We love tanks. You love tanks. Everybody loves tanks. Well, not exactly - more like everybody loves machines with chain treads because they are interesting, not that common, very easy to build and could tackle a lot of obstacles.
![]()
 Now, after the robot is built, close the box so that it's out of your way and the desk is clear.
- Collect all parts from the desk and put them back in their places in the box.
- Close the box and move it to the side so it's not in your way.
Programming
Тоday we would look more at the constructions and less at the programming. The program must be - move forward. With this program you will test the different gear wheels on your robot.
How to on Gears (part 1)
Gears could be a powerful tool for those who know how to use them appropriately. In this episode we introduce some of the basic terms and concepts behind using gears in your construction.
Each mechanism you build has its unique needs, based on its aim. In some cases, you need more speed and in others - you need more torque or power. In some cases, you need a linear motion and in others - it should be circular. To achieve that you need to build a system of gears that will fit your needs. In this part of the gear tutorial we will cover and explain some of the basic terms behind the physics of gear systems.
Speed
First of all, let's take a look at the term "speed" and explain the difference between linear and rotational speed:
- linear speed is the distance an object travels for a certain amount of time. It is measured in kph, mph, m/s etc. Knowing the speed of an object enables us to calculate the distance it will travel. For example, if a car is traveling at a speed of 50 kph, then it will travel 100 km in two hours.
- rotational speed is the number of rotations an object makes for a certain amount of time. Usually, it is measured in rotations per minute or RMP. For instance, the Large LEGO EV3 Motor has a rotational speed of 150RPM when set to 100% power. Hence, if we program it to rotate for 120 seconds or 2 minutes, it will rotate 300 times.
Torque
After we have learned what speed is, we will move on to the next key characteristic - torque. Torque is a rotational force. Simply put, it is the force you have to apply to stop an object rotating. The larger the torque of a motor is, the greater the force you will need to stop it.
For example, if we want a robot to climb on an inclined plane or surface, or if we want it to pull a large load, we will need more torque. On the other hand, if we want our robot to compete, we will need more speed.
Mechanical Power
The last concept we will cover is mechanical power. For our purposes, we can consider the following:
Mechanical Power = Rotational Speed X Torque
When we set the power of the motors from the Move Blocks, we actually set the mechanical power. So, when we increase the value, we not only increase the speed of the motor but also we increase its torque.
Gear Wheels
Now, we are ready to put into practice what we have learned so far. Gear is the group of gear wheels that engage and hence drive each other. The gear wheel that is directly driven by the motor is called a driver gear, while the one that is attached to the wheels, or the output gear, is called a follower gear.
Each gear wheel has multiple teeth on its circumference. When we put two gear wheels next to each other, the teeth engage. As a result, when we rotate one of the two gear wheels, the other one also rotates. Interestingly, every time a tooth from the first gear passes through the engage point, a tooth from the second gear will also pass.
To see this in practice, construct the gear following the instructions in the video.
Simple LEGO Gear System with 1:5 ratio
This is a simple LEGO Gear System with a ration of 1:5. When the large wheel rotates 1 time the small wheel will rotate 5 times.

![]()
 Tasks to finish a class
- Take pictures and make videos of your robots
- Disassemble and arrange the robot
- Arrange your workplace
- It is important to arrange the electronics of the robots on the cover of the box.
- Wind up the programming cable so that it is assembled.
- Put the robot cables next to the electronics.
- Wind up the mouse cable around the mouse.
- Wind up the cable of the laptop charger in a way that your teacher will show you.
- When you turn off the computer, leave it next to the robot box.
- Turn off all programs on your computer
- Exit FLLCasts
- Shut down your computer
- Put your chair under the desk.