

EV3 Phi. Teacher's Note. Recap on turning with LEGO Mindstorms robot
A special fourth case for a turning with robots with two wheels.
- #426
- 02 May 2017
A special fourth case for a turning with robots with two wheels.

Now that we know how to make the robot move forward let's see we can make it move backward.

One of the interesting things in this sequence of videos is the program. The program detects when the system has reached the maximum speed and then stops the motor from rotating. We detect this with the EV3-G software

Unpacking the VEX EDR set and learning the names of the different parts included in the set
This LEGO Education SPIKE Prime video tutorial demonstrates the difference in turning slow and turning fast and using the Motion sensor to understand the orientation of the robot. We do 10 consecutive runs. The goal is to understand what can you expect from the robot behavior in terms of consistency.

Yes, we know. Starting with the phone when you have a toy car and a Raspberry Pi might seem strange, but this is why we do it.

In this tutorial, we show you how to display all the values from an EV3-G array on the EV3 brick display. We are using an array Read Operation along with a loop. We are also detecting the loop counter and using it as an index to an array. It's basically the only viable way to do it. The process is commonly referred to as - "Iteration over an array" (although we still do not have an iterator in the programming language, we promise that one day we would do the super advance videos on "iteration" using the LEGO MINDSTORMS robots")

The next challenge of the course is to build a container where you could store the balls (objects) that you are collecting. The first thing is to see how it works as an end result. You can use the same principle during FIRST Technical Challenge competitions. You can also fire the balls, just by rotating the axle in reverse.

In the EV3-G software, you could use negative numbers for power and rotations. In this episode, we would look at what is the meaning of this numbers and make a few notes of where the teacher must be more careful.

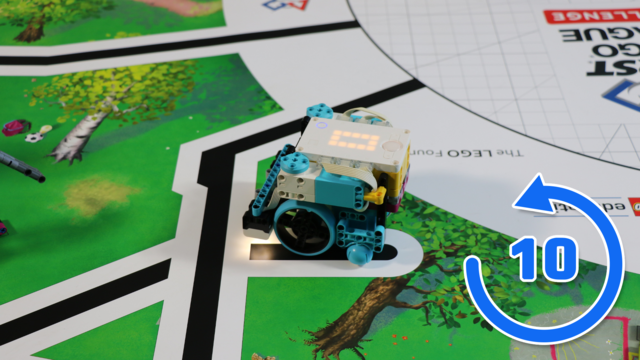
In this video tutorial we will reach a specific location on the field 10 times. This programs demonstrates the accuracy and consistency of a program that used the Motion Sensor to detect the angle at which the robot rotates. At the end of the tutorial you will have a visual and clear picture of what you could expect from this basic usage in terms of consistency and accuracy. This might be enough for some cases and it might not be enough for others.

In the RobotC software we could make the robot wait for a couple of seconds by using the wait function. This will give the motors a chance to work and this will actually move the robot.

How important is it to have predictable behavior in your classes.

Note for the teacher on making the construction more stable, more durable and using beams for this.

How to control the speed of the motors and the speed of the robot.

We are about to connect the whole car with the lights and motors to the controller. Let's recap to know what is ahead of us, what would the process be and what is the end result of the next couple of sections when at the end we have a car controlled by the phone

The tutorial is about what are the parts that you should buy to have the Ball Collecting mechanism.

In this episode we combine in a single program the previous two programs for moving forward and backward.

In the course, we are going to use the following components and hardware elements. It is important to know their names and what are they used for.

The length of the lever has a certain effect when hitting the ball. In this tutorial, I would like to discuss what it's the effect.

We are ready to build the first program for moving the robot forward and backward. We learn how to build simple programs for moving the program. But it is not that easy...downloading to the robot does not always result in the robot moving.

To control the VEX Cortex controller we must use a software. In this episode we would download the software from the VEX site. Strange thing is that you must select your region correctly even if you are not in this region

Throwing/Shooting is a common challenge in FIRST LEGO League competitions and in this robotics video tutorial we are demonstrating an attachment that you can use to throw/shoot a ball. There have been missions for throwing balls like in bawling, or like in soccer/football. The attachment that we use relies on the properties of the plastics used for the LEGO MINDSTORMS Robot Inventor 51515 set - it bends and it throws.

We would start connecting a lot of things to the Raspberry Pi. It will be good if we could have some way of referring to the pins on the Raspberry Pi. For example like Pin 5 or Pin 26. Luckily there is such a way.

The topic of this tutorial is the purpose of a system of gears when throwing a ball.

Why we change the robots all the time and what to observe in each new robot.

How to keep the discipline in the classroom and how to cheer up the students.
To prepare the robot to move in a square and to use a loop in the program we would first make this VEX EDR robot move forward and turn, using a program developed with RobotC.