This tutorial outlines the two ways to upload programs to the SPIKE hub and which one is preferred.

To access the full video please subscribe to FLLCasts.com
- #1652
- 20 Aug 2020
There are multiple ways to upload a program to your robot but they all involve the menu on the bottom right.
Option 1: Bluetooth control
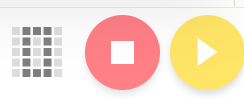
Before uploading a program this way, make sure that your robot is already on the field (if there is one) or on the floor. Click on the yellow "Start" button and your robot will immediately begin executing the program. If there is an error with the program and your robot is about to crash into a wall, you can click on the red "Stop" button to end the program. This may be the easier method of uploading programs but be aware that it is banned on official robotics competitions like First LEGO League. Thus you should learn how to manually start programs from your hub, even if you prefer using Bluetooth.
Option 2: Manual control
In order to start a program manually you must first upload it to the hub. Click on the square grid button and a menu will pop up on top of it.

The 0 that is displayed means that your program will be uploaded to the hub's slot 0. In later courses, we might need multiple programs for the same robot and then we would need to remember in which slot is each program. For now, we will use the default slot 0. Click on the upload button (the one with the arrow pointing down) and your hub will make a short clicking noise. This means that the robot has recieved your program and is ready to execute it.