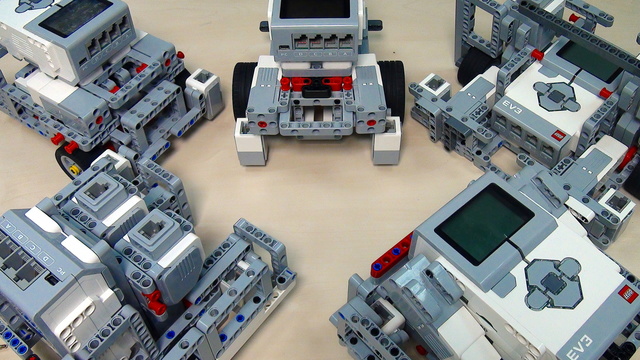
In this episode, we introduce a LEGO Mindstorms EV3 version of competition robot construction. It is a modular construction, with medium motor for additional attachments and two light or colour sensors for orientating on the field.
- #58
- 03 Nov 2014
- 7:20
- LEGO MINDSTORMS, LEGO MINDSTORMS EV3
- FIRST LEGO League, Robot Base Chassis, EV3, Robot Base, FLL, Construction
In the video, we take a look at the construction and point out some key characteristics of the construction. Under the materials tab, you can find pdf instructions for building the construction of the tutorial. Use the video as a reference to lock the modules together.
If you find the robot too wide, just take out the side frames. If you do not possess two EV3 colour sensors, do not worry, just use old NXT light or colour sensors.
For any suggestions or questions, just post your comment below.
EV3 Competition Robot Light
Building instructions for a Light LEGO Mindstorms EV3 Competition Robot that could be used in LEGO Robotics competitions

![]()
EV3 Competition Robot Full
Building instructions for a Full LEGO Mindstorms EV3 Competition Robot that could be used in LEGO Robotics competitions.

![]()
English
In this tutorial I'll show you an EV3 construction that could give you ideas for building your competition robot or you could just use it as a base for your robot. It consists of two large motors that drive the robot, one medium motor that could be used to power additional attachments, two light or color sensors for orientating on the field and, of course, a brick.
Below the materials tab following the video you could find pdf instructions on how to build these modules. There is also a pdf file where you could find instructions on how to build the whole robot. Now, I'll assume that you have already built the modules and I'll go through the process of assembling them and focus on some of the key features of the construction. First of all, we have the two large motors and you may notice that there are these Lego pieces at the back of the motors. Their purpose is to hold the cables firm so, before we proceed with building the robot, we have to take them out, take a cable, put it into the motor, hold the cable firm and put the Lego pieces back.
This is quite a good technique to have the cables in place and you could use it in other constructions as well. Now I'll do the same thing on the other motor. Again, put a cable into the motor, hold it firm; and put the Lego pieces back.
OK. Now I can proceed with building the robot. First, we have the front frame. You attach the two motors onto the frame. Like this. And the other on the other side. Then, you have the back frame that should go into the three holes at the back of the motor. First, I'll attach the first motor and then the second one. OK. Then you have the back wheel which, as you see, has this flexible pin which is turning. You have to put it into the middle hole of the back frame. Here.
After you put it, place back the back wheel on the back frame and press the red pin so that it will lock the back wheel. As you can see, it's firm now. OK. Next, we have the sensors. In the instructions we use two EV3 color sensors but you could use one EV3 color sensor and one NXT light sensor if you do not have two EV3 color sensors. So, I'll attach the sensors to the lower two points of the frame. Then, I'll attach the EV3 color sensor.
Then, we have the medium motor. We use these four blue long pins to attach it to the front frame. So, they should go into the four wholes on the upper part of the frame. I'll attach them.
OK. Next, we have the shield which has several purposes but the main one is to cover the two sensors so that they will be more accurate. I'll just attach it to the angled beams. OK. The holder has fallen.
So, I'll put it back.
Next, we have the side frames. They are attached to the motors via these two black pins. So, they go in here - in the two holes. Their purpose is to hold the wheel from the outer side because if you just hold the wheel to the motor, it will move all around and it will be inaccurate while moving on the field. OK. I'll use the red pins in here and at the back to lock the frame. Now, as you can see, the wheel is hardly moving while the other one is quite unstable. So, I'll put the other frame on the other side. Again I'll attach it to the motor using these black pins.
And lock it with the red pins.
OK. Now it is a good time to attach a cable to the medium motor because when we put the brick onto the robot it will be difficult to place the cable inside. So, I'll attach the cable. The cable should go through the back frame. Then I'll put the brick onto the construction.
OK. Finally, I'll connect the cables to the brick.
And you have your construction ready.
Courses and lessons with this Tutorial
This Tutorial is used in the following courses and lessons
FIRST LEGO League Competition. Constructing and Programming a Robot Base
This course if used by teams, mentors and students to structure the preparation for the Robotics Game of the FIRST LEGO League Robotics Competitions. One thing that is common each year at FLL is that experience matters a lot. Our goal with this course is to quickly bring new teams up to speed with experienced teams and to share some new tricks, patterns, constructions with the more experienced teams.
- 42
- 249:53
- 10

Constructing a robot base
Five different robot chassis. This is the goal of the series. To present ideas for different design of the robots and especially the robot bases. If the base is stable and balanced, then in could easily be extended. Let's start with the most simple of the five.
- 10
- 6
- 5
- 3d_rotation 9

Instructors Remote Training
If you are working with students and you want to introduce Robotics to your class or you want to mentor a FLL team, but you are insecure about your technical knowledge in the Robotics field, then this is the right place for you. Having in mind teachers' busy schedule, we have design two different schedules and added an option to design one just for you. FLLCasts's Mindstorms EV3 Robotics Online Training is the perfect match for any teacher.
After the completion of each task the participant has to upload his solution for verification.
- 136
- 280:11
- 156

Competition programming
In this episode, we introduce a LEGO Mindstorms EV3 version of competition robot construction. It is a modular construction, with medium motor for additional attachments and two light or colour sensors for orientating on the field.
- 7
- 0
- 8
- 3d_rotation 1
Instructors Remote Training
If you are working with students and you want to introduce Robotics to your class or you want to mentor a FLL team, but you are insecure about your technical knowledge in the Robotics field, then this is the right place for you. Having in mind teachers' busy schedule, we have design two different schedules and added an option to design one just for you. FLLCasts's Mindstorms EV3 Robotics Online Training is the perfect match for any teacher.
After the completion of each task the participant has to upload his solution for verification.
- 136
- 280:11
- 156
Mechanics
Gears could be a powerful tool for those who know how to use them appropriately. In this episode we introduce some of the basic terms and concepts behind using gears in your construction.
- 6
- 0
- 7
- 3d_rotation 0