
Постройте петминутен робот
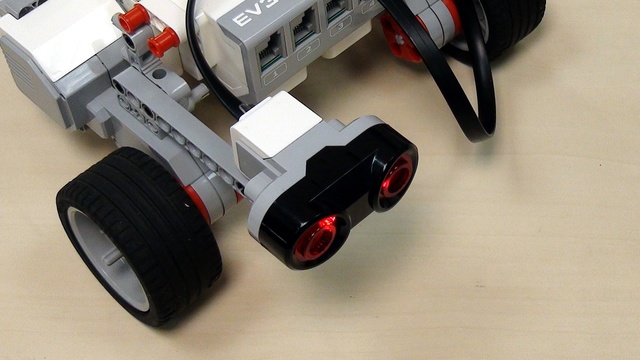
В това видео ще покажем как се строи Петминутният робот и ще го прегледаме накратко.
- #386
- 18 Mar 2017
Very introductory resources if you are just starting with programming and building.
В това видео ще покажем как се строи Петминутният робот и ще го прегледаме накратко.


След като вече изпробвахте и се справихте с предизвикателство, включващо поредица от инструкции, искаме да ви представим някои добри практики.

По време на този курс ще работите с други ученици в една група. Те могат да бъдат ваши съученици, съотборници или ученици, които познавате от други извънкласни дейности. Важно е да познавате цялата група, за да можете да работите заедно по най-добрия начин.

Tasks for the Gyro sensor that you can use in STEM classes, while preparing for a competition or just to explore how the sensor works.

The Gyro sensor can be positioned horizontally, vertically or at a random angle. Have you ever wonder what does the gyro detect when it is positioned vertically. This is the subject of this video tutorial for the LEGO Mindstorms EV3 Gyro Sensor.

Let's explain the problem of just waiting for the Gyro sensor to detect an angle and think of why the robotics systems work like that.

Turning with the Gyro Sensor on a specified angle and stopping there have never been easy. It is not going to get any better. However, this is not a problem of the Gyro sensor. The problem is in the way we develop our programs.

The Gyro sensor in LEGO Mindstorms EV3 sets is new for the sets and we answer basic questions about its usage. The sensor detect when the whole constructions turns at a particular angle, but there are a number of gotchas in using it.

Tasks on using the LEGO EV3 Mindstorms Color sensor. Quite fun and useful for different STEM classes or just to get to know the sensor.

The color sensors supports different modes of working. In this video we are working with the Reflected light, which is not actually the detected color. Most robotics sensors actually work with reflected light and you should definitely learn how to use this mode.

The program from part 3 should be refactored and improved to make it easier to understand and support. We extract most of the repeatable behaviours in a loop and this reduces the size of the program three times in terms of the number of blocks used.

Use the color sensor to count the lines and stop on the third line. We do not use the wait block for this.

Counting lines and stopping on the third is the subject of this video. It is important to know how to do this in order to conduct more than one experiment in STEM classes (if we consider that each line is an experiment)

Very simple and basic introduction to the color sensor in the LEGO Mindstorms EV3 set. The first program is to stop at a line. Then we can move from stoping at line to counting lines and even more complex tasks.

Tasks for school STEM classes or home exersie. Try to solve them to submit your solutions below.

Follow an object using the LEGO Mindstorms Ultrasonic Sensor. Object moves away, the robot moves with the object. The program is very useful if you are doing STEM classes and you want to demonstrate results. People react very well to a robot following you like a dog for example.

Stop on detecting an object with the Ultrasonic sensor and move after detecting there is no object. Join of the previous two video tutorials in one

The robot detects an object. After the object is remove we want to make the LEGO robot move forward.
We are introducing the LEGO Mindstorms EV3 Ultrasonic Sensor. The first program is actually to detect an object and stop near it, at about 4 inches/10 centimeters. The ultrasonic sensor could be used during robotics competitions, but most of its use is for experiments.

Tasks for STEM classroom and home exercise to get you used to using the LEGO Mindstorms Touch sensor. Solve them, build a program, record a video and upload your solutions below.

The way sensors and programs work in a robotics system is sometimes not-intuitive for a beginner, but nevertheless very logical. Building a program for a touch sensors for "Press->Go->Press->Stop" using the EV3-G software could be quite challenging at the beginning even for experienced teachers, students and robot builders.

We create a program for detecting when the Touch Sensor was Pressed/Released. Move until it is pressed, continue when it is released.

Complete introduction to the LEGO Mindstorms EV3 Touch sensors from the very first step. In this video tutorial we program the robot to stop on touch sensor pressed. Again, this is based on your feedback that much of our tutorials in previous years were a little more advanced and that we have never made a proper introduction. A few more videos on touch sensor will follow after this

Robot tasks to exercize how to position on the field using only motors. STEM classes could use it to demonstrate mechanical imperfections in constructions and how important using sensors in this LEGO Mindstorms Robotics sets is

The way you move the robot is always imprecise. Don't TRY to fight with this. Programming motors for competitions like the FIRST LEGO League (FLL) or World Robotics Olympiad (WRO) is not very different from programming the motors in the STEM classes. But there are a few things you should have in mind.

Experiment with moving the robot in different geometrical figures. The tasks could be used in STEM classes for introducing students to geometry and math.

Move the robot using the Move Steering block. We explore what the different values for Steering mean and how to use them. We also explore how the motor is configured to run for a number of rotations or seconds and what is the difference.