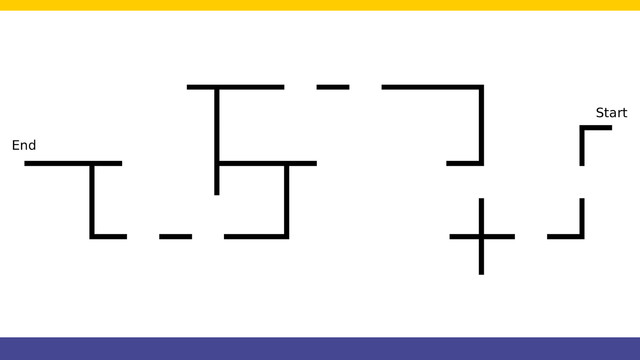
Next important state is Turn Right with our robot. This happens when we detect a line on the right.
- #210
- 24 Feb 2016
- 8:51
- LEGO MINDSTORMS, LEGO MINDSTORMS EV3
- FIRST LEGO League, Line follow, The Arab championship for robotics - Line Tracking, EV3-G, EV3, State machine, Light and Color Sensor, FLL, Programming
States
We enter the Turn Right state whenever we detect a line on the right. This is one of the top priorities for our robot - to look for a line on the right.
Turning right is in the course done with just the motors. In an idea case we would not be dependent on the motors rotation, but we would use sensors while turning. Let's first start with the simpler case and in some of the next courses we would explorer how to make the robot use the sensor when turning on 90 degrees.
EV3 Competition Robot by Mic Lowne
The instructions for building the improved EV3 Competition Robot by Mic Lowne

![]()

Courses with this episode
The episode is used in the following courses where you can find additional tasks for it to use in class
The power of State Machines. Gapped and Crossed Line Following with LEGO Mindstorms EV3
Use this tasks in you STEM classes:
Tasks description, submission and evaluation are available to subscribed users.
Subscribe now to access the full capacity and get feedback.
English
The next step in our program is to make the robot decide on turning right. So move forward, turn right and then continue and if there is a gap just pass through it. So our next state will be turning right.
Before turning right, I noticed a small problem in the program from the previous video and it is in the pass gap block and I would like first to fix this problem. The problem is that after we pass the gap and we just move with the motors, we must actually detect the line, that is continuing after the gap. This detection must happen in this block. So we must start motor B, just on with a small power, like 20 and we wait until we detect black with the second sensor.
And after that we stop with motor B. So this is a small modification that we must add to make sure that our robot works every time. Let's first download the program and then we'll go for the right.
So the program is working now let's focus on turning right. Our idea for turning right was that if we see a line to the right, then we must turn to this line. Again, these were our cases. if we see a line to the left and there is nothing to the right we just turn left, but each time there is something to the right, like in this 4 cases, we must always turn right first. So if we detect something with the right sensor, we must turn right. Let's implement this in the program.
Now we must check the value of sensor 1, in this case this is our color sensor, connected on port 1 and it's the right sensor. And we compare, if the color on the right sensor is back, then we must set the state to turn right. If the color is black, only then we set the state to be, let's say that state 2 is turning right, state 2. 0 is following a line, 1 is detecting a gap, and 2 is turning right. For this we'll just turn the robot right. First, we'll stop both motors, then we turn right. Since the right motor is motor B and the left one is C we'll just turn motor C forward for one rotation.
Before that I would like to return back for like a few degrees and this is very dependent on the robot construction that you have and where the sensors are located. In our case we stop both motors, we return back a little and then we turn right, by rotating motor C 1 rotation forward. And this should turn the robot right. Then we again enter into the same state for following a line. Robot moves, detects, and we turn right and pass the gap.
We can even start the same program not from turning right, but from this position, it will follow and again continue. So we can start it from different positions and it will decide. One more modification to the program so that you can make it more stable. This is the part of the program that is making the robot turn right, we stop both motors, we move back a little, then we turn with the left motor, so it can turn right and to make sure that the program works correctly. We must be on the black line after we turn right. What we'll do is to move motor, let's say B
and we'll just turn the motor On, forward, slowly. Most of the time we are over the black line after the turn, but to make sure that the robot does not make mistakes, we have to wait until we are on the black line and we'll compare with color for the middle sensor and this middle sensor will be the one on port 2 and we're waiting until we detect black line with this sensor. Then we stop motor B.
And this whole behavior here is the one for turning the robot right. I'll take this, build a new block,
It's not general turn right, it is especially designed for this motor, for this robot on this field.
Our whole program now looks in the following way.
Calculate the state in which our robot is based on the sensors, for now sensor 2 which is the middle and sensor 1, which is the right sensor. Based on the state we are in, we can be either in following a line, state 0, state 1, we are passing a gap and state 2 we are turning right. One more run of the robot.
The robot turns right on this section and then detects the gap. We can even start it from here, the same program.
In the next video we continue with turning left.
Courses and lessons with this Tutorial
This Tutorial is used in the following courses and lessons
The power of State Machines. Gapped and Crossed Line Following with LEGO Mindstorms EV3
There comes a time when you need to program the robot to "follow a line, but if another sensor detects something you would like to stop, do some work, and then continue following the line". This is applicable to competition robots as it is applicable to real-life robots.
There comes the State Machine Pattern. An advanced and very powerful concept that allows you to easily implement complex robot behaviours with a simple, well-organized, extensible, bug-free program where the robot could be in 1,2, 10 or 100 states and you will still be able to manage the complexity of the world around the robot.
- 12
- 92:11
- 0

Turn right state
Next important state is Turn Right with our robot. This happens when we detect a line on the right.
- 1
- 0
- 0
- 3d_rotation 1