In this video tutorial we use the LEGO Education SPIKE Prime Motion Sensor to reach a mission model on the field. It's a basic use of the motion sensor that we will extend in the next few tutorials and in the same time we take the opportunity to demonstrate what a MyBlock is and how to develop one. As a result of this video you will learn how to make the program easier to read and maintain by organizing the blocks in the program in special MyBlocks that couple them all together.
- #1929
- 28 Jun 2022
- 8:42
- LEGO Education SPIKE Prime
- Move straight, Scratch, LEGO Education SPIKE App Word Blocks 2, Programming, Sensors, Gyro Sensor, Motion Sensor
My Blocks is a concept that you will see throughout the course and also it is the concept of Functions and Procedures in programming languages. MyBlocks could accept parameters, which we as engineers that are quite lazy, often call "params". That that jargon. That's the language. In the tutorial we build a MyBlock that accepts two params.
How to use this tutorial
Download the program to the robot. Experiment with running another sequence of "Move Towards" my blocks. Check how the robot will behave. Try to reach a few new mission models with every run.
English
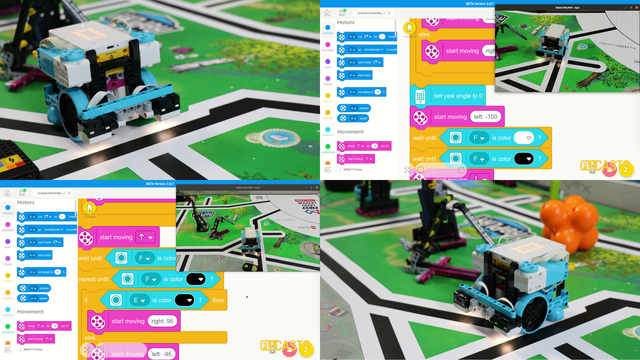
In this video tutorial. We use LEGO Education SPIKE Prime and we reach a mission model. A mission model that's on the other side of the field. So we have to do a couple of turns to get there. We use the motion sensor and again we use a basic program for the motion sensor, but we've made it a little bit more advanced with my block. Let's see how the program behaves and what's our end goal. We move with the robot. We follow a straight line. Now it doesn't look like it's a straight line because the robot is moving left right, left right, left right. But that's the basic algorithm for keeping a straight line with the robot. And we've reached the mission model. Let's now run it one more time and then we'll enter into programming.
One more time. Starting from the base, the robot moves, turns left, keeps a straight line, turns right, keeps a straight line, moves forward almost the length of the field, then turns and it reaches a mission model. That's our goal. That's our goal with this Lego Education SPIKE Prime. On this FIRST LEGO League, how consistent is this? One more time. It's much more consistent than not using sensors, but of course this is a basic program. This is the next step. We can now improve this with more and more. It is important how you start the robot and the angle that it is facing because this angle is important for the motion sensor. But at the end we reach the mission model. Let's stop here, enter into the programming and see how we develop the Scratch program for this.
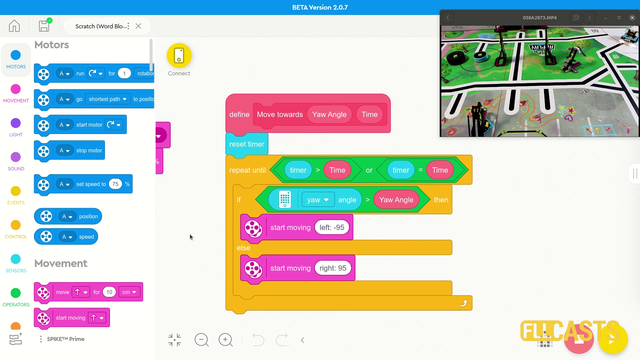
Here is the program. It's a Scratch program that we've developed for this LEGO Education SPIKE Prime. And let me zoom in a little. We've introduced a new concept with this program and that's the MyBlock you can see the program. And on the right the recording. So let's move through the program. And see what our idea was when the program starts we set movement to motors A and B and we set speeds to 50%. It's our general best practice. We reset the yaw angle. It's always a good idea when you start from the base reset the angle then the program looks like this: move towards
move towards zero three, move towards -55 three move towards 48 and move towards -55 two, so what are these numbers here and what's this block. This is here one My Block. We've created our own block that we can reuse and you can see the block right here. It accepts two params one is the yaw angle and the other time move towards zero. So try to keep the robot moving towards zero angle for 3 seconds. Then try to rotate and to move it towards -55 for 3 seconds then move it towards 40 for 8 seconds. You can see that there are some advantages of this program. It makes it much more clear because when you are reading the program like this, you see only simple blocks like when program starts set, move on to speed, move towards this angle for that many seconds move towards, move towards, move towards now. How the block itself works, it's rather interesting and we've described this algorithm in the previous motion sensor tutorials and it works in the following way: when the robot starts from the base, we say move towards zero for 3 seconds. Here it is robot moves towards zero for 3 seconds one, two, three so it keeps a straight, line, then it must turn slightly to the left which in our case in our case and that's the tricky part, that's why I love this program so much we move towards -55 so we are telling the robot now that you've moved forward for 3 seconds, please try to move slightly to the left and to keep an angle of -55 in our case this is enough to turn on this black line. Let's see yes, perfect. Then move towards 40. So if here is zero and on the left is -55 then 40 slightly to the right and you can see that this black line is slightly to the right. Let's try moving towards an angle of 40, move for 8 seconds and then we will again turn to -55 that's it that's the program and inside of this program we have the block which we call move forward. And how do you define your own blocks? You define your own block right here move towards we can define our own block which is make a block instructions and we've defined only one block in our program, it's moved on. What do we do? We move towards we reset the timer every time we start from zero because we want to say AHA, move towards this angle for that many seconds and then we do a repeat and deal with walking like a duck to the left and to the right. If the angle is more than the yaw angle that we specified, start moving slightly to the left, otherwise start moving slightly to the right. So this is how we've implemented the column and we repeat this whole process of moving left and right, left and right, left and right, until the timer is up. Checked constantly. If we've reached the time more or equal to the time and if the angle is more than the one specified, then start moving left -95 or right 95 and what you should do is download this program and now experiment with it, download it on your robot. Don't skip this step, it's quite important. Check how will the robot behave if the value here is 90, not 95 or 98? And how will this work for our robot? Now it probably should be the same behavior, but there are always differences between the robots. Even if we follow the same building description, your robot will behave slightly different than our robot. So that's why it's important to experiment with these numbers. Download experiment. And what I hope that you get from this tutorial is that you can define my block, that decouples the logic in a specific block, calculates it so that the complex logic is in the block, and then you can develop simple programs that look like like this. See you in the next tutorial.
Курсове и занятия включващи този Урок
Този Урок е използван в следните курсове и занятия.
LEGO Education SPIKE Prime Programming for Competitions with Word Blocks
Two fundamental concepts are essential for robotics competitions: ensuring the robot consistently navigates and positions itself accurately on the field and designing attachments that complete missions once the robot reaches its target. This course focuses on the first aspect - precise navigation and positioning - while the second is covered across the entire FLLCasts platform, starting with the FIRST LEGO League with LEGO Education SPIKE Prime. "Challenge" competition for 9-16 years old
The goal of this course is to help you learn how to program LEGO Education SPIKE Prime robots to operate consistently and reliably in competition settings. We use LEGO Education SPIKE App Word Blocks, a Scratch-based programming language, to teach key techniques applicable to FIRST LEGO League and World Robot Olympiad competitions. Topics covered include different methods for line following, such as fast, slow, smooth, and using multiple states, as well as techniques for line alignment, double alignment, and maintaining a straight path using the motion sensor.
- 40
- 188:21
- 19
Motion Sensor - Accurately reach a mission model with advanced programs
In this video tutorial we use the LEGO Education SPIKE Prime Motion Sensor to reach a mission model on the field. It's a basic use of the motion sensor that we will extend in the next few tutorials and in the same time we take the opportunity to demonstrate what a MyBlock is and how to develop one. As a result of this video you will learn how to make the program easier to read and maintain by organizing the blocks in the program in special MyBlocks that couple them all together.
- 2
- 0
- 1
- 3d_rotation 1