Box Robot Two. Position of the sensors.
This robot has a color sensor and this sensor is used for following lines. Additional Mindstorms EV3 sensors could be place on the robot, like a Gyro sensor or a second Color sensor.
- #301
- 04 Dec 2016
This robot has a color sensor and this sensor is used for following lines. Additional Mindstorms EV3 sensors could be place on the robot, like a Gyro sensor or a second Color sensor.
You are not using sensors?! You are positioning the mindstorms robot only by moving forward, backwards and rotating it. That`s one of the BIGGEST mistakes teams make on the FIRST LEGO League competitions. In this video we are showing a robot with chains and how imprecise are the results are when you are not using sensors.
Would you like to resolve all the problems with the light/color sensors that you have? And to make all of them work in a predictable, stable way even when using more than one MINDSTORMS colour sensors.
When using Color sensors it is important to calibrate them depending on the light conditions in your venue. In this way, the calibrated sensor will show values between 0 and 100 independent of the light conditions. But using the default EV3 colour calibration available in the colour sensor block could lead to unpredicted problems that are difficult to track and resolved especially when used with multiple Color sensors. So in this series of tutorial we implement the calibration ourselves discussing the principles of colour sensor calibration.
The integral part "remembers" the errors that the robot has made in the past and we can compensate for those errors. This will make the robot return back to the line that we would like to keep it aligned.
It's inevitable. While following this gapped line we would reach a gap. The robot must somehow understand that there is a gap and must make a decision on what to do. For detecting the gap we use the Rotation Sensor. Not the most popular, but very convenient in many cases. Check out the video.
We should multiply the error by a certain number and then add it to the steering of the LEGO Mindstorms Steering block. In this way, by changing the coefficient we change how much/fast should the proportional part influence the steering of the robot.
In this video tutorial, we would do a few experiments with the coefficients for the Integral compensation. There are actually two coefficients - "c" and "b"
In the previous part of the video lesson we showed how imprecise a chain LEGO Mindstorms robot could be if its positioning does not rely on sensors, but only on the use of move block. In this tutorial we will show the same thing, but using robot on tires.
We keep the robot orientation straight while moving, but when we stop the robot could be in a different orientation. This applies for both using the Mindstorms Gyro Sensor when moving straight or the Mindstorms Color sensor when following a line. In this video tutorial, we will do a few examples of when an how this could happen.
This is the final run for our World Robotics Olympiad (WRO) 2015 Elementary Challenge Robot. In "dives", detects the color of the pearl and then counts the number of Ping-Pong balls to release.
This is the first video tutorial from the LEGO Education SPIKE Prime programming course in which we use a sensor, and we've selected to use the motion sensor. The Motion sensor allows us to detect how the robot turns in a 3-dimensional space-time continuum, or, to put it simply, we use it to move straight with the robot. That's it. We want to move straight - we use a sensor, and the Motion Sensor is a good choice.
In this video tutorial we demonstrate the use of the motion sensor and how it could be use to turn precisely to 90 degrees. We demonstrate some of the caveats of the sensor and how sometimes it does not work as expected. Like you set the robot to turn until the sensors detects 90 degrees and at the end the robot is not at exactly 90 degrees.
Let's record the values of the Gyro Sensor while the robot is moving and is trying to keep its orientation straight. This is an interesting experiment and we will have to use file access to write the values to a file.
Showing the same run, but from a different angle. This allows you to see more of the way we sensors work and how exactly the robot positions itself.
This video tutorial is about understanding the "magic". In this video tutorial, we would conduct an experiment and will look at how exactly does the integral part of the PID algorithm compensate for the error that the LEGO Mindstorms EV3 robot makes.
Sometimes when we are working with sensors it is important that the time between two consecutive samples is the same. This will make each sample equally important and independent of how much time it took to take it. In this video tutorial, we would use the EV3-G timer block to make a "WaitForTick" program where the time between each sample of the EV3 Gyro takes exactly 0.02 seconds.
In this tutorial, we would implement a program that finds the minimum and maximum value detected by the sensor and stores this two values in an array.
Many times we just upload blocks and leave it up to you to use it. In this tutorial, I would like to show you how to use the implemented blocks. How to import them into the EV3-G software. How to see them in the palette. How to drag and drop them to build a working program.
In this video tutorial we demonstrate the classic algorithm for following a line with robots. It is widely used in FIRST LEGO League competition and could be applied to LEGO Education SPIKE Prime and to other robots also. The algorithm follows a line by moving to the left and to the right and trying to stay at the edge of a black line.
After we take each sample, we perform calculations and these calculations could take different time. It is important to know how much time does it take to perform the calculations. In this video tutorial, we would data log the time and plot the data.
"Array initialization" is the first step in every program that involves Arrays. This applies to most programming languages and for EV3-G it is a must.
In this tutorial, we would show you how to initialize the array and how to extract this logic in a new block
In the course section for Advance Sensor Calibration we previously showed you how to find the minimum and maximum value for a single LEGO Mindstorms Color Sensor and to store this value in an array. The program was implemented with the EV3-G software. In this tutorial we are going to find the Min and Max for all the four sensors and to store all the 8 values in an array.
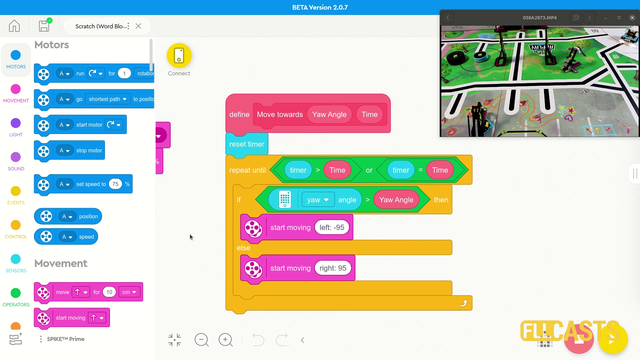
This is one of the last tutorials in the LEGO Education SPIKE Prime programming for Competitions course and it demonstrates what we've all been waiting for - how to reach a mission model from base in a reliable and consistent way when the mission model is on the other end of the field. Naturally what we use are all the different concepts that we've learned in the course and the tutorial is more advanced than the other so if anything is not clear take a look also at the different tutorials an concepts in the course.
Implement a program for stopping at a black line with the blocks containing the implementation details for the InitArray, Calibration and Getting the calibrated result.
Following the Advance Light/Color sensors calibration for a minimum value for a single sensor tutorial, in this one, we continue with finding the maximum value detected by a sensor and storing this value in an array.
In this video tutorial we show how you can build robots that position on the field consistently and reliably by following and line and then aligning to a line. We also demonstrate the concept of "double align" which is quite powerful and even if there were some mistakes they will be handled.
On of the most precise ways to position on the FIRST LEGO League and other competition fields is to follow and align and in this tutorial we demonstrate exactly this - how consistent and reliable this method is to reach specific mission models. In this way you know that every time you will be at the right place, which is great.