Accomplishing many tasks with a single attachment for the FIRST LEGO League (FLL) 2013 competition. The attachments are using many rubber bands. What is interesting is that it collects/lift/triggers many things at the same time. This is how you could save time and parts during a competition.
- #169
- 18 Nov 2015
- 9:44
- LEGO MINDSTORMS EV3
- FIRST LEGO League, FIRST LEGO League 2013-2014 Nature's Fury, Attachments, FLL 2013, FLL, Construction
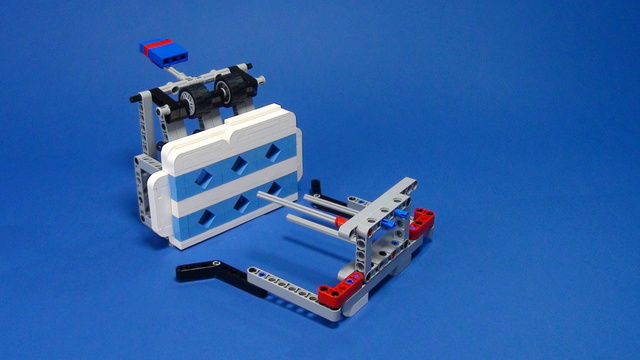
FIRST LEGO League Nature's Fury Robot Attachment
Building instructions for this LEGO Mindstorms EV3 attachment for the FIRST LEGO League Nature's Fury robotics competition

![]()
English
In this video tutorial we'll demonstrate an attachment for solving a number of missions at once and these are missions from the Nature's Fury competition, FIRST LEGO League (FLL) and they include The Truck, The Ambulance, The Tsunami, we have The House and we collect one of The Humans with the loop and this is an attachment that does several things, it includes few rubber bands, it's a pinless attachment, so it's quite interesting, I doubt it could be used directly in another competition, but the principle of building such an attachment will help you for other mission models.
As a reminder what are the missions, let's check the missions, so this here are The Truck and The Ambulance and they must be transported to another region on the field. You can lift them, push them, pull them, you just have to transport them and there's some cargo in the truck also, and you must transport them to another place on the field. The next mission that we are solving today is The Tsunami. It's mission model that looks like this and it has 3 of these parts and the goal of the mission is to move with the robot and to push on this lever so that the 3 parts fall, that's the goal of the mission and it was positioned like, The Tsunami was here and The Ambulance was here and The Truck was here, something of that sort. That's what was the position on the field. And we have The House, because it's from the Nature's Fury, what the robot must do is move near The House, push on this lever and lift The House, that was the mission for The House and near the House we had a Human with a loop and the idea was that you must collect the loop, so we must somehow take the loop, return it back to base and lift The House. These were the missions. Now, for the attachment we are building an attachment that solves all the missions without returning to base, so you move the robot out of base and you solve all the missions with this attachment. This here is the attachment, it's quite complex, but I'll describe everything about it. First, this is the robot, it's the EV3 competition robot, you can find links for constructing this robot below the video, and we must attach the attachment to the robot and it's entirely with rubber bands and with levers, so we don't need anything from the motor, so we don't need to transfer power from the motor, but we must do it in a pinless way, and you can use a module like this, when you need, of course there are different holes here, you can use them, but you can also use a module, like this, that could be positioned like this and it's pinless and you just place it, no pins involved and it's quite fast.
Depending on you construction and the front of the robot, you can change the whole module, for example you can make it a little shorter.
Now you have an attachment with 2 axles and the distance between them is less than in the previous attachment. And if you have other wholes, for example you would like to use this one you can modify the attachment. Whenever we need to add a pinless attachment and there are not enough holes we can extend the robot with such a module. The other important thing is that for this specific attachment, in order to extend it like this, you just return it to the initial position with the axles and I need my other axle, right here.
This is my extension for the robot, so that I could add pinless attachments to the robot. I could place it like this or I could place it like this. It depends, of course, again on the construction that I need, but I need for these wholes to be empty and in order to this, we must disassemble the module and remove 2 of the pins in the original construction that you have the instructions for building below, there're 2 pins right here and I've removed them so that all the 3 holes of the beams are empty and we can add the extension like this. Now let's attach the attachment. Let's look at the attachment. The whole attachment, the whole construction. We add it to the extension, like this, and now the whole attachment is pinless. What we can do with this attachment is just remove it quite fast and add it again to the robot. It involves 3 axles. This is one of the axles and the other 2 axles are at the front of the robot.
Now we add, right here, the 2 axles and it's pretty easy to add the attachment to the robot, and quite fast. Now how do we solve the missions with this attachment. The first 2 missions are The Truck, we just move with the robot and the truck enters in this compartment here. Now we can move with the robot and with the attachment and we can push the truck, and we can turn with the truck and it's pretty easy to move the truck to another region on the field. Then we have The Tsunami, the next mission, and it was positioned like this, and the 3 parts are here, like this. Now when the robot is moving and we move like this. We move and we slightly push on the part and the 3 parts fall and then we continue pushing and what will happen
is that the whole part will return and it will get at the back of the attachment, so that we can do the turn. We have the lever here and with rubber band, it works like this. This is the initial position. We just return this.
This is the initial position of the attachment and when we push on this part of the attachment, there's some force, because of the rubber part, right here, and because of the rubber band, but after a certain moment, the whole attachment returns at the back and with this we have more space on the front because our next mission is to take, The Ambulance, it was about a few inches away from The Tsunami and we continue with the robot and we take The Ambulance. Then we continue and then we place the ambulance and the truck to the region that we want, there were some green regions, yellow regions, but it's just a matter of movement. It's not very interesting. The interesting part is again in the attachment. you have the attachment at the front of the robot then you push on a certain mission model, the whole attachment returns back and now you have more space at the front and it is held by this rubber band.
Courses and lessons with this Tutorial
This Tutorial is used in the following courses and lessons
FIRST LEGO League Competition. Attachments
This course is a collection of materials for many of the attachments that we've built at FLLCasts before introducing courses. The videos were built as separate different attachments for different competitions and with the following course, we try to give it a structure.
- 60
- 347:26
- 0

Attachments with Rubber Bands
Let's try to integrate more of the things we have learned into a single attachment. One that could accumulate energy, conserve it and use it at the appropriate time. All this because of a Rubber Band and a Flywheel - and if you don't know what a flywheel is you should definitely watch this videos
- 12
- 0
- 0
- 3d_rotation 9

FIRST LEGO League (FLL) 2013 Nature's fury. Review of solutions with explanations
These are a couple of structured examples and tutorials of how the missions for FIRST LEGO League (FLL) 2013 Nature's Fury competition could be accomplished. We've gathered recordings and explanations from which students and teacher can learn a lot. There are rubber bands, lifting attachments and a lot of trucks that we are pulling and pushing at this robotics competition.
- 10
- 79:11
- 0

Multiple rubber bands attachment
Accomplishing many tasks with a single attachment for the FIRST LEGO League (FLL) 2013 competition. The attachments are using many rubber bands. What is interesting is that it collects/lift/triggers many things at the same time. This is how you could save time and parts during a competition.
- 3
- 0
- 0
- 3d_rotation 3