This is one of the last tutorials in the LEGO Education SPIKE Prime programming for Competitions course and it demonstrates what we've all been waiting for - how to reach a mission model from base in a reliable and consistent way when the mission model is on the other end of the field. Naturally what we use are all the different concepts that we've learned in the course and the tutorial is more advanced than the other so if anything is not clear take a look also at the different tutorials an concepts in the course.
- #1918
- 21 Jul 2022
- 13:02
- LEGO Education SPIKE Prime
- Move straight, FIRST LEGO League, Scratch, LEGO Education SPIKE App Word Blocks 2, FLL, Programming, Motion Sensor, Gyro Sensor, Light and Color Sensor, Sensors
The program is split in many different parts. There is line following, there is line crossing and detection, there is "moving in straight line with motion sensor", there is align to a border, timers, sensors, angles. Everything is connected naturally in a single program. Additionally the robot is not slow. It is reasonably fast.
How to use this tutorial
Try to replicate the behavior of your robot for your field and mission. Choose a mission at the other end of the field and by using the concepts from this tutorial try to replicate them.
English
In this video tutorial we will look at one of the complex missions in the FIRST LEGO League competitions and one of the most challenging things is how to reach specific positions on the field. You start from on the base. You must follow lines, use different sensors. And then at the end you must repeatedly every time consistently reach a certain position on the field. And in the tutorial we will explain the program we will explain how we develop this program and how we can reach specific weight mission, rowing mission every time.
Let's take a look at the program again. We start from the base and we follow a black line and we continue. To follow this black line with the color sensor and we are following the line pretty fast. After a couple of seconds we are at the other end. We align to the first line, then to the border, then to the second line, then we align again to the border and then we reach the mission.
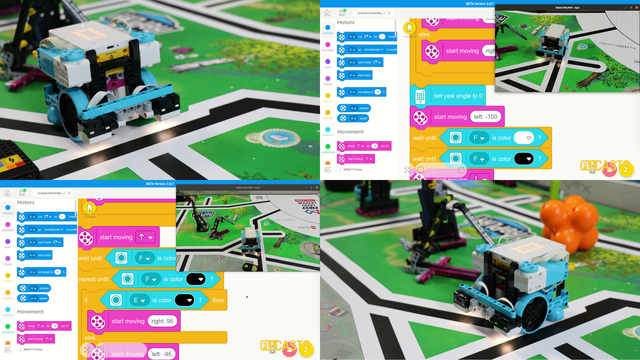
As a next step from the tutorial we look at the program that we've developed for reaching a specific location on the FIRST LEGO League field. And this is a program, it's a scratch program word blocks, it's developed with LEGO Education SPIKE Prime and on the right I have a video of our robot and how it works and on the left I have the program. So let's look at step by step what each of the blocks is doing and how does this affect the behavior of the road. First we start with some initial installation where we just set relative position to be at zero. We start with motors A and B for 40% just to get out of base. The goal here is to just move forward for about 5 cm, get out of base and that's it. It's this move here. This is getting out of base. Then the next step is the repeat until this repeat until it's very interesting because it has two conditions we repeat the following thing will continue to move forward as we have this here start moving while the relative position of B is less than 600. Which means that this is the relative amount of degrees that we have to turn in order to reach the next position on the field. It's not exactly we don't know it, but we know it's relative. And what does it mean? I forgot to explain. So for this robot we have two motors motor A is the left motor, motor B is the right motor and we also have two color sensor motor E, color sensor E is the left color sensor and color sensor F is the right color sensor. We move with the robot until the left color sensor detects a line. But we don't want to detect this line and stop here, we want to stop from the third line. So we just move relatively forward for 600 degrees and then we start looking for a line with the left hand and you'll see this in a minute. In the meantime, while we are moving and waiting for this event to occur, the robot follows a line and this is how it looks aligned. You can see that it stays on the black line. And the way it stays on the black line is that we detect with color sensor F. This is the right color sensor. We detect if we are on the line and we do the following thing, if the light reflected is a certain level, we move slightly to the left or we move slightly to the right. Or slightly to the right. Because this start moving if we pass a positive number, positive number for start moving, then we move to the right. If we pass a negative number, then we move to the left. And if the line is too black, it will be probably a positive number, if it is too light, it will be a negative number. So in this way we move with the robot and we follow the line.
Now, here we detect with the left sensor the first black line. This means that this condition will be true. But we still haven't reached a relative position of 2600. So we continue forward. We are still in the repeat until we continue forward and we move second black line. We detect it, but we still haven't reached 2600. So we continue. And now we reach somewhere around here. We reach 2600 position. And then we start looking for something that's black. And we can detect it with the left color sensor. And when we detect it, the repeat until stops right here. You see that the robot stops right here. We stop moving and we wait for about 0.1 seconds. We are currently right here. Then we set the yaw angle of the motion sensor. This is the angle of rotation. And we start moving with motor A, which is the left motor and move at 20% of the speed and move until the robot has turned to about -85 degrees. This is how it looks like we'll continue the video the robot moves until it reaches about -85 degrees. So it's about 90 degrees. Because there is an inertia there again move and we stop motor A. Then we wait. Then we reset the angle again, we reset motor B and we start moving back. How much - until motor B had a relative position. Of -360. So for about one rotation until we bump into the wall. And when we bump into the wall, we try to move back but we move in a straight direction. This here is a repeat until that helps us move in a straight direction. Here it is. We continue the video move straight until we reach the border. And then we bump into the border and we stop somewhere around here. We stop. Then I will explain this repeat until in a moment. Because it also repeats itself. The idea here is that we move back in a straight ride until we bump into the wall, then we wait, and then we move forward again, until we reach a color center, until sensor E sees a black line. Here it is. We start moving back until the sensor moving forward, until the sensor detects a line, which is somewhere around here it detects a line. If you see how it stopped for a moment, like exactly here it stopped for a moment. And here is how the move forward and move straight works. And it's the same. Repeat until that we are using the whole program. Now that we stopped, we are currently right here. We set the relative position to be to zero. And we start moving forward with this motor and with the other motor they are still just moving forward. And we wait to move to about 470 degrees. And the way this move forward keeps the robot straight the following - with the angle and we subtract the angle from -30 and we add it to 30 and this is the percentage speed. And this start moving and block.
It accepts two parameters. The first parameter is for the first motor, and the second parameter is for the second motor. And when we have two params, what we can see is that we can move one of the motors slightly to the left and the other slightly to the right. So if the angle is zero. Let's say it stays straight, we move and it's straight straight. Then temp will be zero and temp will be zero. So we are moving with 30 30. So we move the robot forward. But if angle is about five degrees, then we move with 25 35 and 25 35 will slightly turn the robot to one side and then we detect. This means that we must align the robot. If the angle is minus five, then it will move with 35 25 and this way using the angle, we can alternate the way we move with the motors. And we try to keep this angle zero. So if it goes slightly to the right, we try to compensate. If it goes slightly to the left, we try to compensate. This is how it looks like. And we move forward for about 470 degrees. With the motor we stop, we wait, we set the angle to zero and we return with motor A until we rotated the problem to about 90 degrees. Here it is again, this part of the program. This weight is right here. And we stop, wait for a second. Again reset the motion sensor we move back and move in straight line back. Note that here we have 30 because we are moving in a straight line back again move back until we bump which means about -720 degrees right here, we wait, we set the relative position to B. And now we start moving again. And we move again until B has reached something over 100 degrees, which looks like this. We stop, we wait for a second, we start moving with motor A, which is the left motor, and move forward until we've reached an angle of about 85 deg. And we stop. We exit the program. And this is how we reach a specific position on the field. And this is a step by step overview of what the program does. Now, there is a tutorial in the same lesson here at fllcasts.com where you can see at least ten runs of this mission and how accurate this program is. And it's quite accurate as a program. So I'll advise you to go check it out, see all the different accomplishments of this mission, and download, try to understand again this program. And if you have any questions, just reach out to us so that we can help. Bye.
Courses and lessons with this Tutorial
This Tutorial is used in the following courses and lessons
LEGO Education SPIKE Prime Programming for Competitions with Word Blocks
Two fundamental concepts are essential for robotics competitions: ensuring the robot consistently navigates and positions itself accurately on the field and designing attachments that complete missions once the robot reaches its target. This course focuses on the first aspect - precise navigation and positioning - while the second is covered across the entire FLLCasts platform, starting with the FIRST LEGO League with LEGO Education SPIKE Prime. "Challenge" competition for 9-16 years old
The goal of this course is to help you learn how to program LEGO Education SPIKE Prime robots to operate consistently and reliably in competition settings. We use LEGO Education SPIKE App Word Blocks, a Scratch-based programming language, to teach key techniques applicable to FIRST LEGO League and World Robot Olympiad competitions. Topics covered include different methods for line following, such as fast, slow, smooth, and using multiple states, as well as techniques for line alignment, double alignment, and maintaining a straight path using the motion sensor.
- 40
- 188:21
- 19
Arrive at a specific position
This is one of the last tutorials in the LEGO Education SPIKE Prime programming for Competitions course and it demonstrates what we've all been waiting for - how to reach a mission model from base in a reliable and consistent way when the mission model is on the other end of the field. Naturally what we use are all the different concepts that we've learned in the course and the tutorial is more advanced than the other so if anything is not clear take a look also at the different tutorials an concepts in the course.
- 2
- 0
- 1
- 3d_rotation 1