
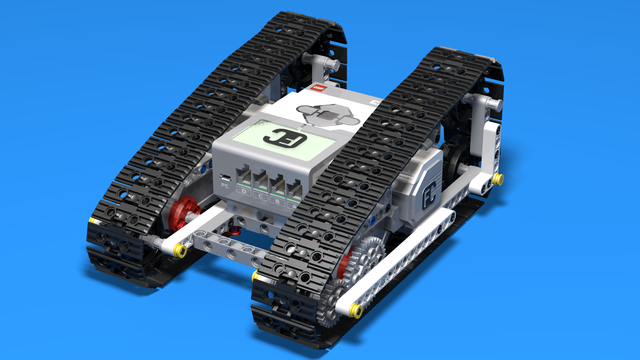
Drag car - LEGO Mindstorms EV3 car
Let's go fast. Large wheels on the back. A lot of torque, small wheels on the front, good aerodynamics. Here we go.
These are building instructions for a LEGO Mindstorms EV3 Drag Car.
- #406
- 21 Mar 2018
Let's go fast. Large wheels on the back. A lot of torque, small wheels on the front, good aerodynamics. Here we go.
These are building instructions for a LEGO Mindstorms EV3 Drag Car.

Building instructions for constructing a simple LEGO Model that has red, green, blue and yellow beams. This makes it perfect for operating robots through color code.

Building instructions for a LEGO EV3 Robo-tank. The construction is incredibly simple, with an upright Brick, which makes it perfectly suitable for lessons with students.
We love tanks. You love tanks. Everybody loves tanks. Well, not exactly - more like everybody loves machines with chain treads because they are interesting, not that common, very easy to build and could tackle a lot of obstacles.

Two missions in one. This attachment accomplishes the Hydrodynamics Fountain and Faucet missions from the FIRST LEGO League Hydrodynamics 2017-2018 competitions. The attachment shows a really interesting and widely used approach of a single attachment that is used for two, three and even more missions. This is a standard practice for many of the advanced teams, especially those that reach the finals. The based of the robot is the LEGO Box Robot Three With Large Wheels and Thee light sensors and one Gyro

These are building instructions for an attachment accomplishing the FIRST LEGO League 2017-2018 Slingshot mission. The based of the robot is LEGO Box Robot Three With Large Wheels and Thee light sensors and one Gyro

We have to admit. This is quite an interesting missions. There is a Manhole cover and it must be turned upside down. Well, the robot must turn it. Again LEGO Box Robot Three With Large Wheels and Thee light sensors and one Gyro is used as a base for the Robot.

Building instructions for a LEGO Truck. The robot is presented as an Ammo Truck but it can be used for transporting various other objects, too. The construction has a rear drive with each of the rear wheels driven by a Large Lego Motor. The front wheels steer using a Medium Lego Motor. The Brick is placed at the front of the construction which gives the opportunity to easily attach different sensors, based on the task.

Introduction to robotics - The first level of the Robotics with LEGO curriculum for students in second, third or fourth grades. A journey in space, with robots. Various constructions with robots are built. Learn how to control the motors so that the robot navigates around the Sun, the Moon and Earth in various ways. Getting to know the first of the sensors. The robot can feel its surroundings with the help of the Touch sensor and avoid obstacles.

This is a very funny robotics hand with 3 fingers that you could put on your hand to "Rule the World". It's funny to control it with the touch sensors.

Probably the largest multi-purpose FLL attachment at FLLCasts. These attached is doing a number of missions at once. 4 of them. You attach it to the robot and start the program. The robot moves and accomplishes a number of missions using only this attachment. At it also has a lot of parts. It is quite large and you can not build it from a single set. But that's ok because you are preparing for a competition, right?

Building instructions for the LEGO Mindstorms EV3 Catapult. The robot has a motor, a clutch to control it for manual shooting and a touch sensor for automatic loading. The bottom base is removed which means the Catapult could not be turned around. Nevertheless, the baseless robot is small enough to be built in class.

Here is another great example of a large multi-purpose attachment used in FIRST LEGO League competitions. This one is specifically for the 2017-2018 Hydrodynamics competitions and is doing a number of missions. (01) Pipe removal, (06) Water Treatment and (08) Manhole cover.
The attachment consists of two parts. The first part is placed on the robot while the second part is in front of the robot and the robot pushes it. While working on the field the robot leaves the second part on the Water Treatment plant and when returning back collects it back and returns to base.
The goal of the attachment is for you to build it and experiment with it with the existing field. Use Box Robot 2 as a robot base on which to add the attachments.
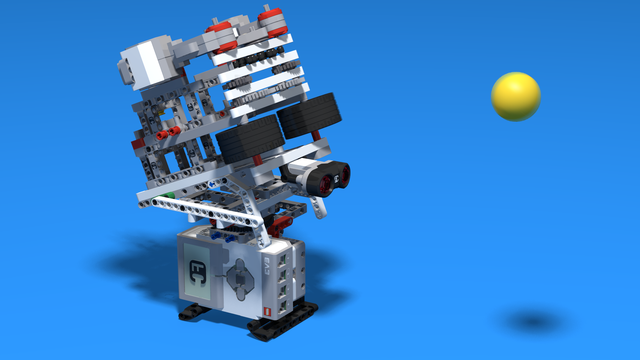
Building instructions for a LEGO robot that shoots 40 mm ping pong balls. The shooting mechanism is powered by two EV3 Large motors, while the whole mechanism is rotated by a medium motor. The robot can store up to 6 ping pong balls and has a Ultrasonic Sensor to detect targets.

In this course, we would like to introduce you to multi-purpose attachments. These are attachments designed to accomplish a number of missions when the robot goes out of the base in the FIRST LEGO League competitions.
You've all seen them. They are kind of large, powered by a few motors and sometimes use rubber bands, levers and other mechanisms.
Use the course as a preseason preparation and try to solve the tasks to prepare for next year competition. Even if you don't have the field, build the attachments and follow the tasks to inspect their behaviour. Modify them as needed when said.
This is the first draft of the course including only the attachments in different sections. If you are interested in learning more please enrol in the course and in the next few weeks we would try to record the video tutorials.


As we are already off the season we decided to look back at the competition. First, we will take a look at the working solution for FIRST LEGO League 2017 Manhole Cover. This was generally accepted as one of the most difficult missions during the competition. We've built a single attachment to accomplish it.
(we are releasing the video without explanations and will add the explanations later)

The goal of these building instructions is to build a simple LEGO Mindstorms EV3 robot without wheels. You should then think of yourself how exactly to add the wheel. Which wheels would you use on the front? How are you going to build the third wheel? Here are for example a few recommendations on building the third wheel - 1, 2, 3, 4
Later on you can expland this construction with a grabber as demosntrated here.


