In the final video we explore how to trigger the release of the attachment with just a rubber band. The release is triggered with a gear wheel that rotates in a specific way. This saves speed, does not require additional LEGO Mindstorms motor and is precise enough for a competition.
- #112
- 15 Nov 2015
- 7:22
- LEGO MINDSTORMS, LEGO MINDSTORMS EV3
- FIRST LEGO League, FIRST LEGO League 2013-2014 Nature's Fury, Attachments, Rubber band, FLL 2013, EV3, FLL, Construction
One motor, three movements. This saves parts, time and efforts durring LEGO competitions like FIRST Lego League (FLL), World Robotics Olympiad (WRO) and others similar competitions.
Previous videos:
Truck Robot Attachment for FLL Nature's Fury
Building instructions for a LEGO Mindstorms EV3 Truck Robot Attachment for the FIRST LEGO League 2013 Nature's Fury robotics competition

![]()
Grab and Lift an Ambulance Robot Attachment
Building instructions for a LEGO Mindstorms EV3 Ambulance Robot Attachment for the FIRST LEGO League 2013 Nature's Fury robotics competition. The attachment grabs the ambulance car and slightly lifts it. The rubber bands help with triggering the attachment at the right time

![]()
Ambulance and Truck Robot Attachment
If you take a look at the videos for this attachment you will see a nice idea on taking the track and the ambulance. These two vehicles from the FIRST LEGO League 2013 competition had to be collected and returned back to base.
Built from LEGO Mindstorms EV3 parts.

![]()
English
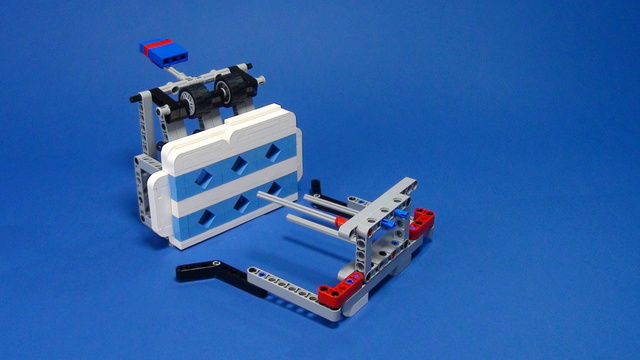
As an overview of the previous videos of the series we built an attachment that was taking the truck and the ambulance from the "Nature's Fury" 2013 competition, we had one motor on the robot and with this motor and with couple of rubber bands we had two movements, we were catching the truck and the ambulance, and we were lifting them. These are the two movements with only one motor. Now in this video we will explore how can we actually release the truck and the ambulance when we get them to the yellow region.
Because the attachments for the truck and for the ambulance are quite similar we had the same attachment on the left and on the right side. I'll disassemble it and I'll just work with one of the attachments.
For example the left side. Remove this from here аnd here we have the left side of the attachment. We add this to the robot. And now it is working like this we start the motor and it moves up the whole attachment or we can move it down.
Pretty simple.
Now let's see how it works from this side. We have a gear wheel, right here, connected to a small gear wheel so we have two gear wheels and this is the driving one. It gets some power from the motor and it transfers it to the large gear wheel аnd then we can lift the whole attachment. Because we are lifting and we've attached the attachment with only one pin, right here, we add some additional support. It's a pin that supports right here. In this way there's less bending when we lift the whole attachment.
Again.
We start lifting the attachment or we can release it. Now when we have this mechanism with the levers here and the rubber band open, we reach the truck, we catch the truck, we lift the truck like this. Now we must find a way to release this lever so we can release the truck.
As you can see here there is a small, very small, gear wheel a black gear wheel. Let me just get the camera closer.
Here is the very small gear wheel, that's actually doing the job and we have these parts here. When we continue lifting the moment when the small black gear wheel touches this part here it will start rotating. And when it starts rotating it will also rotate the grey gear wheel. This one here. When we rotate it we will actually release the whole truck.
Look at it.
I'll do this again slower. Now let's do this again. Of course because I have not programmed the robot, I'm just controlling it from the brick. I cannot control the power but if you have the program you can do the lifting and the release very slowly. Now, we've caught the truck and we start lifting the parts, like this. Very, very slowly.
Again. And now when the black gear wheel touches this part here, it will start rotating and when it rotates it will also rotate the gray gear wheel and It will rotate in one direction, then we'll actually release the levers like this.
As you saw, with a single motor and one rubber band, we did 3 movements. We caught the truck, then we lifted the truck and then we released the truck. So these are 3 movements with a single motor. Now, there's one interesting thing about this attachment, that make the whole magic. Let me just disassemble it.
As you can see there's one more rubber band right here. It's the white one. the purpose of this rubber band is the following.
When we have the attachment, we can see that the black gear wheel right here does not actually work with the grey gear wheel right here. So, as you can see they are in different position. Now, when we lift the truck there is some force because the truck is not very light, it's quite heavy and all the part are bending. Like this. And the moment that the parts are bending is actually the moment when the two gear wheels start working together. Like this...
So, now they are not...and now they start. So, we use actually the force of gravity to move the gear wheels to a position where they can work together and we need this rubber band to support the whole module here.
Find the instructions for building the 3 modules of our attachment below the video.
These were the 3 modules. So, we have two parts of the attachment that are basically identical with the one that is transferring power.
We welcome any comments if you have ideas for other videos or like us to build a lesson for other topic. Comment below the video and we'll try to build one.
Курсове и занятия включващи този Урок
Този Урок е използван в следните курсове и занятия.
FIRST LEGO League Competition. Attachments
This course is a collection of materials for many of the attachments that we've built at FLLCasts before introducing courses. The videos were built as separate different attachments for different competitions and with the following course, we try to give it a structure.
- 60
- 347:26
- 0

Attachments with Rubber Bands
Let's try to integrate more of the things we have learned into a single attachment. One that could accumulate energy, conserve it and use it at the appropriate time. All this because of a Rubber Band and a Flywheel - and if you don't know what a flywheel is you should definitely watch this videos
- 12
- 0
- 0
- 3d_rotation 9

FIRST LEGO League (FLL) 2013 Nature's fury. Review of solutions with explanations
These are a couple of structured examples and tutorials of how the missions for FIRST LEGO League (FLL) 2013 Nature's Fury competition could be accomplished. We've gathered recordings and explanations from which students and teacher can learn a lot. There are rubber bands, lifting attachments and a lot of trucks that we are pulling and pushing at this robotics competition.
- 10
- 79:11
- 0

Truck and ambulance mission
With this series of videos we are looking at FIRST LEGO League 2013 Nature's Fury competition and we are building a robot for accomplishing some of the mission. It would be a tutorial with at least four parts and we are building a complex attachment that could catch, lift and release different parts with only one motor and rubber bands. Not one, not two, but three movements with only one motor.
- 4
- 0
- 0
- 3d_rotation 4