Content for Classes with students


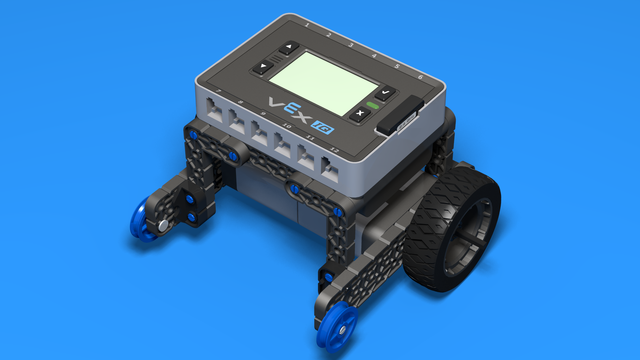
VEX IQ Easy Bot
VEX IQ version of an Easy Bot. It's simple and appropriate for classes of students.
- #309
- 29 Jun 2017

VEX IQ Easy Bot v2
It's the second version of VEX IQ Easy Bot. It's simple as the first one, but the motors are rotated.
- #310
- 29 Jun 2017

VEX IQ Easy Bot v3
It's the third version of the VEX IQ Easy Bot with rotated Robot Brain and castor wheel.
- #311
- 29 Jun 2017


Hangout print material for playing the game on paper
Use this handout material to learn more about the game and how to play it
- #85
- 09 Mar 2016
- 1

VEX IQ Robot Base Chassis 4 v2
It's the second version of the Robot Base 4, but with rotated inside motor.
- #315
- 15 Jul 2017

VEX IQ Robot Base Chassis 2
Vex IQ robot base which could be used with different attachments. The gravity center of this robot is in the backside and it has a lot of space in front for attachments.
- #312
- 10 Jul 2017


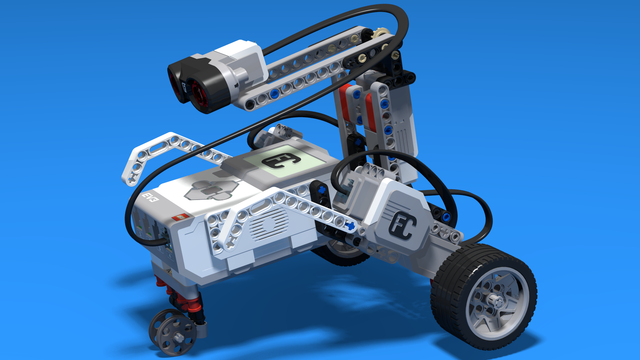
EV3 Easy Bot v2
This is the second version of the EV3 Easy Bot. The robot is used in classes with students as one of the first robots to be built. Easy to follow and to arrive at a construction even for first-time students.
- #337
- 16 Aug 2017


Instructors Remote Training
If you are working with students and you want to introduce Robotics to your class or you want to mentor a FLL team, but you are insecure about your technical knowledge in the Robotics field, then this is the right place for you. Having in mind teachers' busy schedule, we have design two different schedules and added an option to design one just for you. FLLCasts's Mindstorms EV3 Robotics Online Training is the perfect match for any teacher.
After the completion of each task the participant has to upload his solution for verification.
- 183
- 280:11
- 156

Robopartans Methodology of teaching in robotics classes
This is a Material supplementing the Instructors training course. Attached is our methodology for working with students. If you spend some time to read it beforehand, we can discuss only the questions that you have, instead of listening to the whole thing. That will be a more efficient usage of our time in the training.
- #343
- 01 Apr 2018

Simple Tank Robot with LEGO Mindstorms EV3
The first thing every student wants to build is a LEGO Mindstorms EV3 robot with treads. Well, we have one. Take a look. It's really funny.
Can you make it move? Send us a video or picture in the comment section below.
- #344
- 18 Sep 2017
Perfect STEM course. Module 1 - Smart Car with Raspberry PI
Disassemble a remote control car. Change the brain of the car with a smart computer like Raspberry Pi. Build a smart device with artificial intelligence that you could control from your phone and that could freely navigate itself in the real world and on the Internet. Use your hands. Develop programs for your robot and your phone. Be curious and invent.
The perfect course lives up to its name. You move through the content, we check it and return feedback to you.
In the end, you should be able to better understand how to program and design smart devices that would make the world a better place. For everybody age 12+, 16+, 21+, 35+, etc. The hardware costs about 150$. It changes through the years so it might take some time for you to find it as Raspberry PI, motor drivers, power banks and h-bridges.. they change. Note that the course was designed to be led by a teacher with a decent knowledge in embedded hardware and software. This, on the other hand should not stop you, if you are curious.
- 118
- 42:47
- 136

Frankenstein LEGO Robot with motors in opposite directions
Building instructions for the robot build with LEGO Mindstorms EV3. It is called "Frankenstein" because the two motors are in two different directions.
- #77
- 28 Feb 2016
- 1

Space Cleaner
Building instructions for a LEGO Mindstorms Robot that cleans the landing site when landing on a different planet. Built from an EV3 set it is a perfect simple tank robot with continuous tracks for lifting and moving things. Basically cleaning.
- #355
- 24 Nov 2017

MotoCar Bot - LEGO Mindstorms Robot that is kind of like a forklift
"How do you build a forklift using only gear wheels and levers without a rake"... Ok, we would admit that is a difficult question. It even sounds difficult. So let's start with something easy. A LEGO Mindstorms EV3 robot. It lifts objects in the air. It uses two gear wheels that work together and then move in different directions and are placed perpendicular to each other... This sentence kind of got difficult again... Let me try again.
Follow the building instructions with these 70+ steps and you will have a very nice robot and you will learn a simple trick of how to use gears and change the directions in which they rotate.
- #365
- 16 Jan 2018

Spy Bot - LEGO Mindstorms EV3 Robot used as a spy
"Bot. Spy Bot."
Many of us are fascinated by the idea of spies. Movies for "spies" are also very popular and if you haven't watched them check out the 007 movies. These here are building instructions for a LEGO Mindstorms robot with two touch sensors and one ultrasonic. It could be used as a spy - sneaking closer to you and detecting if you move or if you touch it. The whole idea for this robot came from NXT when there were sound sensors. Currently, there are no sound sensors in the EV3 set, but the robot could again be quite fun to program.
- #366
- 12 Jan 2018
Spy Vehicle - LEGO Mindstorms EV3 Vehicle acting as a spy
Following the Spy Bot, we have this new Spy Vehicle. Yes, yes it is using an ultrasonic sensor.
The building instructions are for a robot base that looks like a car but is not exactly a car and has a strange shape. Just like spy vehicles - a car, but not only a car and not just a car.
- #367
- 18 Jan 2018