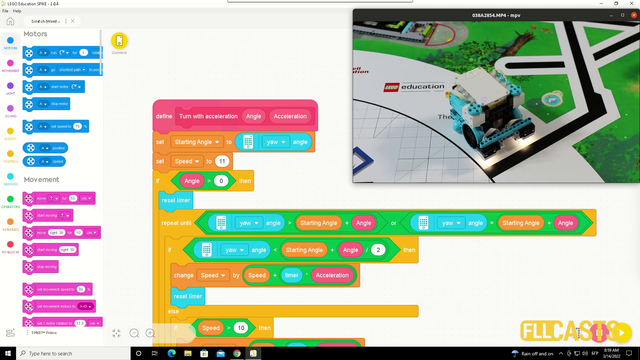
In this video tutorial we explore acceleration and deceleration and how to make the robot turn precisely by using acceleration and deceleration. The goal is for us to demonstrate a program that turns the robot to 90 degree. In the first 45 the robot is accelerating and in the second 45 it is decelerating.
- #1927
- 06 Jun 2022
- 11:34
- LEGO Education SPIKE Prime
- Scratch, LEGO Education SPIKE App Word Blocks 2, Programming, Motion Sensor
How to use this tutorial?
Use the program to download it on the robot and run it. Experiment with it. Try to read it and to understand it. Make sure understand what is happening in the program and what is the idea. Move through it with the students and team members and help understand how the program works. Only by reading other peoples programs we get to learn new things that we can use in our programs.
English
In this video tutorial, we use the LEGO Education SPIKE Prime robot and we explore another option to turn precisely with the robot with a motion sensor. But on top of this, we'll implement. Our own block for acceleration. And with acceleration, we will get a better precision when we turn with the robot and the motion sensor. Let's see how the robot works. To start the robot, it accelerates and it rotates to about 90 degrees. For each robot, this will be different for our robot it is consistent. And the goal of the acceleration here is that we slowly start turning and we slowly stop. In this way, we reduce the friction between the wheels and the map that gives us the inconsistent behavior of the robot. Let's check out the program. On my left, I have the program, and this is the program that we developed for this robot. It's a Scratch program, word blocks with LEGO Education SPIKE Prime. And on my right, I have video recording of how the robot works. It's a LEGO Education SPIKE Prime robot. And let's move through each of the blocks and understand, how do we program the robot to accelerate and to use in the same time the motion sensor, the motion sensor that's embedded in the LEGO Education SPIKE Prime brick. This is our simple program, and we start with set movement to Motors A and B. The left motor is A, the right motor is B. And we've developed our own block that's called turn with acceleration. So feel free to take this block. And to use it in your programs and to use the same ideas. And after we turn with acceleration, it's a block where we implement acceleration ourselves. We stopped the program, so we just. Turn to 90 degrees with acceleration 30. Now, this thirty is just a configuration of arrival, and it tells us, how fast do you want to accelerate and you have to experiment for each robot. For each robot that you build, you have to experiment, which values bring you the best result. Let's see how the robot turns. Start. Initially, it accelerates right here. It accelerates from zero until it reaches about 45 degrees. Then it starts a process of deceleration until it reaches about 90 degrees. So now our robot does not stop at 90 degrees. Our robot stops at about 92, 93, 94 degrees. So we can change this configuration here to be 86, and then it will stop at 90 degrees. This is because of the inertia. Again, start the program. It accelerates from zero to about 45. Degrees, from zero to about 45, and then it decelerates from 45 to about 90 degrees, and it stops. In this way, the behavior of the robot is very consistent. Why? Because of the acceleration. What happens is that the wheels don't slip on the field. And because they don't slip, we maintain their position constantly. And we know that when they rotate because there is no slip, they will be at the same position every time. And that's the trick with acceleration. That's why we don't want to just set the robots to the Motors to a maximum speed and leave the robots like this because this will make the wheels slip. But if we accelerate, we reduce this moment where the robot slips and it's quite consistent as a behavior. And we'll also do a consecutive front so that you can see the behavior last time. Here it is. Let's check out the program. The program works in the following way. First, we define our own lock, our own block. That's called "Turn with acceleration" and it accepts two parameters, angle and acceleration. We set the starting angle. It's a variable that we use. We set the starting tangle, and this all happens initially when we start the program. This all happens right here. When we are in this position, we set starting angle to the angle of the motion sensor and we set our speed variable to 11. It's a configuration that we start with. We've experimented with the weight of our robot and we've understood that eleven is. Probably a good value. Then we start to turn and we have a large if block. If angle is more than zero, because the program will behave in different ways if we want to rotate to a positive or to a negative, let's see the positive side. And the negative is the same, but with minus instead of plus. So if the angle is more than zero, if we want to rotate to 45, 90 degrees, 123 degrees, if the angle is zero, what we will do is we'll use a very interesting concept. Of the acceleration and the timer. We reset the timer of the robot and I will explain in a moment why. And as we reset the timer of the robot, we start a repeat loop. And we repeat this loop until the robot is at an angle that's more than the starting angle plus angle, or it is equal to. So this is our end condition. If we want to rotate the robot to 90 degrees and we start from 20 degrees, we want the robot to rotate and to repeat its rotation until we've reached 110 degrees, 90 degree. We want to continue until 110 degree. And that's the reason why we have this repeat until block. Here what happens in the repeat until we do the following thing. We constantly check the angle of the motion sensor. The angle the motion sensor returns to us, and in this angle is less than starting angle plus angle divided by two. And let me stop here on this equation. This means that if we start at zero degrees and we want to rotate to 90 degrees, we will accelerate the robot until we reach 45 degrees and then we decelerate the robot until we reach 90 degrees. So we have acceleration and deceleration. And that's how these two blocks work here. First, we accelerate, then we decelerate. This here is our if, the angle is less than the half where we want to get the robot to will accelerate. Otherwise, we decelerate. And how do we do this? When we start, we are in the repeat until now. Then we check if AHA is the starting angle plus angle divided by two less than what the motion sensor detects. If it is, we continue, we accelerate. We are in the if. And the way we accelerate Is that. We change the speed of the robot and we change the speed of the robot with timer multiplied by acceleration. So timer is a small value here. It's like 0.10 .07 point something and we multiply this by acceleration and we change the speed of the robot. We changed the speed variable. With this amount, we just changed the speed variable. We continue, we change the speed variable. We continue, we change the speed variable. And now our if returns false. Why? Because we've already rotated to more than 45 degrees, and now we must reach the next 45. So the next 45 are for deceleration and we continue decelerating. Here is our deceleration. You can see that we change the speed with speed minus timer. So here we increase the speed and here we decrease the speed and we decrease the speed until we as we have speed larger than ten. Because for our robot, for this robot. That you see on the video, Speed smaller than ten will not be able to rotate the Motors. There is just not enough power there.
We decelerate and we reach the end. So after each and every if else check we set the movement speed to the speed that we've calculated. Again, while we rotate, we constantly calculate the speed that we want to set to the Motors. If we are in the process of acceleration, which means we are still less than half of our path, then we accelerate. As we pass the half of our path, we start accelerating and we constantly change the speed of the robot. Set movement speed to percent.
The same repeat until block right here is executed but with different signs if we are with a minus angle. So it's the same program, but just with minus angle. And this is how we've implemented our. Own blog for acceleration and deceleration. A blog that you can take and you can use in your programs and you can accelerate and decelerate while turning with the motion sensor, which gives you a pretty good precision. I hope you enjoyed it. And we'll see you in the next tutorial Where we'll do ten consecutive runs.
Courses and lessons with this Tutorial
This Tutorial is used in the following courses and lessons
LEGO Education SPIKE Prime Programming for Competitions with Word Blocks
Two fundamental concepts are essential for robotics competitions: ensuring the robot consistently navigates and positions itself accurately on the field and designing attachments that complete missions once the robot reaches its target. This course focuses on the first aspect - precise navigation and positioning - while the second is covered across the entire FLLCasts platform, starting with the FIRST LEGO League with LEGO Education SPIKE Prime. "Challenge" competition for 9-16 years old
The goal of this course is to help you learn how to program LEGO Education SPIKE Prime robots to operate consistently and reliably in competition settings. We use LEGO Education SPIKE App Word Blocks, a Scratch-based programming language, to teach key techniques applicable to FIRST LEGO League and World Robot Olympiad competitions. Topics covered include different methods for line following, such as fast, slow, smooth, and using multiple states, as well as techniques for line alignment, double alignment, and maintaining a straight path using the motion sensor.
- 40
- 188:21
- 19
Motion Sensor - precise turn with acceleration
In this video tutorial we explore acceleration and deceleration and how to make the robot turn precisely by using acceleration and deceleration. The goal is for us to demonstrate a program that turns the robot to 90 degree. In the first 45 the robot is accelerating and in the second 45 it is decelerating.
- 2
- 0
- 1
- 3d_rotation 1