In this video tutorial we take a next step in programming reliable and consistent robots and this is to learn how to stop at a second intersection. We need this because most of the time when we want to reach a mission model on a robotics competition field, the model will be located away from us and we must use all kind of technique to reach it. In this tutorial - we stop at a second intersection.
- #1947
- 10 Aug 2022
- 6:29
- LEGO Education SPIKE Prime
- Line follow, FIRST LEGO League, Line following, Scratch, LEGO Education SPIKE App Word Blocks 2, Programming, Light and Color Sensor, Sensors, FLL
After you've learned to stop at a second intersection you know how to stop at a third and forth and so on.
How to use this tutorial?
Program the robot to stop at a second intersection. It does not matter if it is for this field or for another field. All you need to do is stop at a second intersection.
English
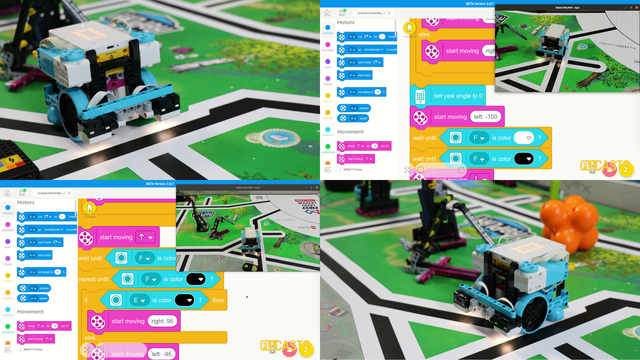
In the previous tutorial with the LEG Education SPIKE Prime robot we stopped on the first line. This was in the previous lesson of the course. Now. We need to extend this program and stop at the second line. Why? Because the field might sometimes require us. The reason why we want to stop on the second line is because we don't want to depend on rotations and on a timer. We want to build a robot in a way that we move and we detect the second intersection. In this way it doesn't matter if the robot makes an error while moving or if a wheel slips or anything. At the end we will be at the same place every time. And this is the consistency and reliability of the robot that we need to have fun at the competition. And you can see that we can start the robot even from a different place. Perfect. Let's see the program. On the right we can see a recording of the robot and on the left, we see the program. And we've already discussed the first part of the program in one of the previous tutorials in the course, in the previous lesson, I think. And we saw how we can stop at the first line. Now, what we need is not to stop at the first line, but at the second line. The second intersection. And the program works in the following way. When the program starts, set movement. Motors A and B. Set movement speed to 30. Generally, this is how we start most of the programs. This repeat until block that we have here, it's not large. And this repeat until block is something connected with stopping at the first line. It's just the program from the previous stop at first intersection. But now we stop at the second intersection. So we just extend the program. Here we stop at first intersection. How we repeat until sensor F, which is the right sensor, will detect color black. We move forward until it detects color black. And while we move forward until we detect color black we follow the line with sensor E and we can configure these values here. It's Quite Important for Our Robot when you download the program and when you use it to configure these values so that you can have the behavior of The Robot that you want you can use 80 and -80 or you can use 90 and -90 or you can use all kinds of different values here with which you can configure different smoothness of the Line following which is important. Now if you want to learn more about how this repeat until block works I would recommend you go to the previous lesson in which we enter into more details. What I'll do now is I'll start the recording and we set movement, we start, we repeat until and I'll stop at the moment, the repeat until, right here. It was right here. I couldn't stop it. It was right here when the repeat until detected the black line with sensor F. And in this moment we are right here, we start moving forward. So the moment we detect the black line with sensor F, we start moving forward with both motors. Why? Because we were following the line up until now and now we continue forward. And what's the logic here? The logic is following: as we move forward, we want to detect this white line here and we wait until sensor F is on white. Here it is. Sensor F is in white and what we will now start is the same program for line following. But this time again we wait for a black line that should be detected by sensor F. So it's the same repeat until as the previous. And this one is the same, everything is the same. And we repeat and we look for a black line. Where is the black line? Where is the black line with the right sensor of the robot? Here it is. Black line. And as we reach the black line, we exit and we stop the program. That's it. And the reason why we want to do this is because in this way we are not dependent on rotations, we are not dependent on timer, we are not dependent on seconds. We just depend on the fact that the sensor on the right will see a line. And since the line is always there and it doesn't change, we have a very consistent and reliable behavior of the robot. And in the next lesson of LEGO Education, SPIKE Prime prime programming for competition course, we enter into one more really neat trick. So how do you align after you've stopped in the intersection? So we'll extend this program a little bit further and we'll reach probably the maximum level of accuracy that you can get with these robots. Follow, intersection, stop align to the lines, and then we will even use a double alignment, which is a very powerful concept that I think everybody should have in their toolbox. Thanks for watching. See you in the next tutorial.
Courses and lessons with this Tutorial
This Tutorial is used in the following courses and lessons
LEGO Education SPIKE Prime Programming for Competitions with Word Blocks
Two fundamental concepts are essential for robotics competitions: ensuring the robot consistently navigates and positions itself accurately on the field and designing attachments that complete missions once the robot reaches its target. This course focuses on the first aspect - precise navigation and positioning - while the second is covered across the entire FLLCasts platform, starting with the FIRST LEGO League with LEGO Education SPIKE Prime. "Challenge" competition for 9-16 years old
The goal of this course is to help you learn how to program LEGO Education SPIKE Prime robots to operate consistently and reliably in competition settings. We use LEGO Education SPIKE App Word Blocks, a Scratch-based programming language, to teach key techniques applicable to FIRST LEGO League and World Robot Olympiad competitions. Topics covered include different methods for line following, such as fast, slow, smooth, and using multiple states, as well as techniques for line alignment, double alignment, and maintaining a straight path using the motion sensor.
- 40
- 188:21
- 19

Follow a line and stop at a second intersection
In this video tutorial we take a next step in programming reliable and consistent robots and this is to learn how to stop at a second intersection. We need this because most of the time when we want to reach a mission model on a robotics competition field, the model will be located away from us and we must use all kind of technique to reach it. In this tutorial - we stop at a second intersection.
- 2
- 0
- 1
- 3d_rotation 1