In the next lesson we usually do a graduation. Write down your impressions about the students and the reasons why they have the grades you gave them.

To access the full video please subscribe to FLLCasts.com
- #619
- 20 Aug 2017
Organizational issues
Writing down your impressions will help you when you have to announce them in front of an audience and you will not have to improvise.
You should write down your impressions in an electronic format and share this information with the academy’s administrator. Usually, this is an electronic table consisting of three columns: the name of the student, the parent’s email address, and a feedback section.
Contact your academy’s administrator for further details.
Feedback to parents about their children
Positive feedback
This letter aims to provide parents with feedback about their children's progress during the classes. You should send such letters regularly following the schedule set by your academy. Every parent should receive at least three letters during the regular courses – one after the second lesson, one in the middle of the course, and one at the end of the course. All letters are personal and sent to the parents of each student. You are not allowed to send group letters!
The topic of the letter should always be informative about its contents. For this example, we could use something like that (names of the student, parent, and teacher are imaginary): Information about Peter’s progress in the robotics course organized by "Robopartans".
Example:
Dear Mr./Mrs. Smith,
My name is John Lewis, Peter’s teacher in robotics. I am sending this letter to inform you about the opinion I have formed about Peter during the course.
Peter is a highly intelligent student who always manages to solve the respective course tasks without my help. He often succeeds in realizing the mistakes he has made while building the constructions and manages to find the correct solution. Peter does not have any problems programming and is very good at it.
(This is an exemplary paragraph. Every teacher should share their impressions.)
We hope Peter will continue to our next level. It will start on September 5th, and we will be very happy to have him again.
Best regards,
John Lewis
This is an exemplary letter!
It is compulsory to introduce yourself and say why exactly you are sending it.
How to give positive feedback
- You should be as specific as possible and you should always give examples. If you do not know what to write about a student, this means that either they have not impressed you enough or that you have not paid enough attention to them. You can fix that if you write down a couple of keywords about this student during every class.
- Do not include only superlatives in the letter. You should include at least one problem at the end of the letter pointing out that you will continue working on the issue in the future.
- Do not use any epithets and do not try to characterize students – for example, if you want to say that a student is rude, try to describe the student’s behavior, rather than characterize them - When he turns his back on me while I am talking to him, I feel like he does not respect what I am saying.
- Give balanced feedback – always give a possible solution or improvement to each problem you are pointing out.
You can use the SECR model in order to structure your feedback:
- Situation - describe the specific situation
- Expectations - describe your expectations in this specific situation
- Consequence - describe the consequence of the situation
- Result - describe the end result of the situation
Example:
- Situation - Peter’s teammate does not allow him to program.
- Expectations - I expected he would put up with it and be bored all the time.
- Consequence - Nevertheless, Peter took things in hand and did not allow anyone to do his job.
- Result - I was impressed by his behavior, which proves he has a strong character and a huge will to learn.
Negative feedback
There may be various reasons for giving negative feedback. Most often, these can be the lack of interest in students, bad behavior, or students' early age.
Here, you can apply the same directions as with the positive feedback, the only difference being that you need to be even more precise when making comments. You will have to provide parents with as many details as possible so they can understand why you have a negative opinion about their child.
The examples below are too common and lack precision. Your negative comments should be full of details and specific situations. Avoid using epithets and behavioral characteristics. It’s not your job to characterize students’ state or give them diagnoses, so consider this completely forbidden. Express your opinion, and do not forget to highlight this is your opinion only.
Example 1:
Dear Mr./Mrs. Smith,
My name is John Lewis, Peter’s teacher in robotics. I am sending this letter to inform you about the opinion I have formed about Peter during the course.
Peter is highly interested in building robots but more often he wants to build his robots without following my instructions. As for programming, Peter is very rarely even willing to try. Nevertheless, the objects he is building are very interesting and show his vivid imagination and abstract thinking.
I think it would be better to wait a little bit before you enroll him in the next level, otherwise Peter might completely lose his interest in robotics and programming.
(This is an exemplary paragraph. Every teacher should share their impressions.)
Best regards,
John Lewis
Example 2:
Dear Mr./Mrs. Smith,
My name is John Lewis, Peter’s teacher in robotics. I am sending this letter to inform you about the opinion I have formed about Peter during the course.
Peter is a very quiet and shy child. Unfortunately, I think Peter is too young and finds the material very complex. Peter has a lot of fun while building robots but encounters problems with programming. His classmate tries to help him and include him in solving the tasks, but Peter often refuses to do so. I would kindly ask you to speak to him, and if Peter has some worries he has not shared with us, I would appreciate it if you inform us so that we can take the respective measures and Peter benefits from the course the most.
I would advise you to wait for one year before you enroll him in the course again. Otherwise, Peter might completely lose his interest in robotics and programming.
(This is an exemplary paragraph. Every teacher should share their personal impressions.)
Best regards,
John Lewis
-
You should use the following phrases more often:
- "When he/she..."
- "I am concerned that ..."
- "I would like to..."
- "I am impressed that..."
- "I would pay more attention to..."
- "Could we be able to find a solution to..."
- "I would personally make sure that..."
- "To avoid similar situations in the future, I would recommend that..."
- "I have noticed the following problem... "
Courses and lessons with this Tutorial
This Tutorial is used in the following courses and lessons

Level C2. "Cooperation". Robotics with LEGO
The sixth level of the Robotics with LEGO curriculum for students in third or fourth grade.
For the first time two different robots are required to solve a challenge. Students learn how to cooperate and find a common approach to the challenges and how to distribute their roles. Various robots are built, even a crane that loads a truck. Students use two sensors at the same time so that they find their target and find out whether their partner-robot is ready with their part of the challenge.
- 41
- 6:39
- 137

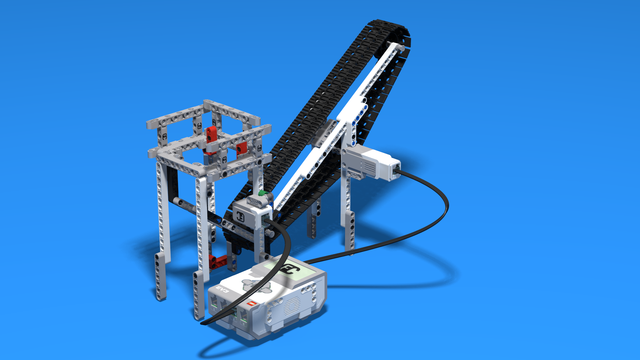
Lesson 6 - Conveyor belt
Introduction
Today you will have to come up with your own robot constructions by using the modules we give you. The robots should sort various types of plastics so that scientists can conduct their experiments.

Why do we want to accelerate waste degradation?
Many of the products we are using in our everyday lives are made of plastics or other non-degradable materials. Very often these things are used only once or twice and then thrown away to landfills where it takes them hundreds of years to degrade. A lot of living organisms die as a result of pollution. That is why today we are going to sort waste, resembled by balls of various colors, so that the waste is ready for testing.
An example of slow-degrading everyday products is plastic bags. It takes about 1000 years for a plastic bag to degrade. For comparison, it takes about a month or two for fallen leaves to degrade in autumn.
- 5
- 3
- 14
- 3d_rotation 2
Level B1. "Spy gadgets". Robotics with LEGO
The third level of the Robotics with LEGO curriculum for students in second, third or fourth grades.
In these lessons, we stress on more complex and challenging robots. The concept of Condition is introduced. Students learn about physics concepts of inertia and center of mass. Robots with two sensors are built and students program both of them. Programming becomes more complex as robots now can make complex decisions. "Spy"-robots sneakily follow their targets, trying to be undetected.
- 30
- 7:30
- 108

Lesson 6 - Spy on Threads
In the next lesson we usually do a graduation. Write down your impressions about the students and the reasons why they have the grades you gave them.
- 6
- 3
- 2
- 3d_rotation 1
Level B1. "Spy gadgets". Robotics with LEGO
The third level of the Robotics with LEGO curriculum for students in second, third or fourth grades.
In these lessons, we stress on more complex and challenging robots. The concept of Condition is introduced. Students learn about physics concepts of inertia and center of mass. Robots with two sensors are built and students program both of them. Programming becomes more complex as robots now can make complex decisions. "Spy"-robots sneakily follow their targets, trying to be undetected.
- 30
- 7:30
- 108
Lesson 6 - Spy on Threads
In the next lesson we usually do a graduation. Write down your impressions about the students and the reasons why they have the grades you gave them.
- 6
- 3
- 2
- 3d_rotation 1
Level B2. "Military Technologies". Robotics with LEGO
The firfth level of the Robotics with LEGO curriculum for students in second, third or fourth grades.
The students build many robots with chain-treads. The Color Sensor is introduced and robots use it to recognize the colors of the objects around them. Students learn about gears, basic gear constructions, and their application. Robots now can stop on a black line and can follow a line using their sensor.
- 37
- 6:37
- 111

Lesson 6 - Line Following
In the next lesson we usually do a graduation. Write down your impressions about the students and the reasons why they have the grades you gave them.
- 5
- 3
- 9
- 3d_rotation 1

Robotics with LEGO - Level 1.0 - Adventure in Space
The first level of the Robotics with LEGO curriculum for students in fifth to twelfth grades.
Various constructions with robots are built. Learn how to control the motors so that the robot navigates around the Moon and Earth in various ways. Getting to know the first two sensors. The robot can feel its surroundings with the help of the Touch sensor and avoid obstacles.
The Ultrasonic distance sensor can help the robot avoid obstacles. Students work with concepts like loop, degrees and medium motor. Robots can now do two different actions at the same time - while solving missions on a field, the third motor clears detected obstacles.
- 126
- 123:52
- 150

Lesson 6 - Exploring the surface of Venus
In the next lesson we usually do a graduation. Write down your impressions about the students and the reasons why they have the grades you gave them.
- 8
- 3
- 6
- 3d_rotation 1

Level A2. "Space exploration". Robotics with LEGO
The second level of the Robotics with LEGO curriculum for students in second, third or fourth grades.
A new sensor is introduced - the Ultrasonic distance sensor can help the robot avoid obstacles. Students work with new concepts like loop, degrees and medium motor. Robots can now do two different actions at the same time - while solving missions on a field, the third motor clears detected obstacles. The first robot with chain-treads is built.
- 63
- 3:02
- 117
Lesson 6 - Parallel actions
In the next lesson we usually do a graduation. Write down your impressions about the students and the reasons why they have the grades you gave them.
- 5
- 3
- 2
- 3d_rotation 1
Level C2. "Cooperation". Robotics with LEGO
The sixth level of the Robotics with LEGO curriculum for students in third or fourth grade.
For the first time two different robots are required to solve a challenge. Students learn how to cooperate and find a common approach to the challenges and how to distribute their roles. Various robots are built, even a crane that loads a truck. Students use two sensors at the same time so that they find their target and find out whether their partner-robot is ready with their part of the challenge.
- 41
- 6:39
- 137
Lesson 6 - Plastic Recycling
In the next lesson we usually do a graduation. Write down your impressions about the students and the reasons why they have the grades you gave them.
- 3
- 3
- 20
- 3d_rotation 2
Level A2. "Space exploration". Robotics with LEGO
The second level of the Robotics with LEGO curriculum for students in second, third or fourth grades.
A new sensor is introduced - the Ultrasonic distance sensor can help the robot avoid obstacles. Students work with new concepts like loop, degrees and medium motor. Robots can now do two different actions at the same time - while solving missions on a field, the third motor clears detected obstacles. The first robot with chain-treads is built.
- 63
- 3:02
- 117
Lesson 6 - Parallel actions
In the next lesson we usually do a graduation. Write down your impressions about the students and the reasons why they have the grades you gave them.
- 5
- 3
- 2
- 3d_rotation 1
Level D2. "Seafaring". Robotics with LEGO
The eighth level of the Robotics with LEGO curriculum for students in third or fourth grade.
In this level, students learn to use the fourth sensor in the robotics set - the gyro sensor. The robots are modeled after boats, yachts, and ships. With the help of the gyro sensor, students can set a course for their robots to a given angle and can detect deviations from the course. In open seas, there may be sea-monsters and the robots are being programmed to detect a sudden change in acceleration with the help of the said sensor.
- 24
- 2:49
- 107
Lesson 6 - Catching the wind
In the next lesson we usually do a graduation. Write down your impressions about the students and the reasons why they have the grades you gave them.
- 3
- 5
- 9
- 3d_rotation 1

Level A1. Introduction. Robotics with LEGO
Introduction to robotics - The first level of the Robotics with LEGO curriculum for students in second, third or fourth grades. A journey in space, with robots. Various constructions with robots are built. Learn how to control the motors so that the robot navigates around the Sun, the Moon and Earth in various ways. Getting to know the first of the sensors. The robot can feel its surroundings with the help of the Touch sensor and avoid obstacles.
- 142
- 133:42
- 187

Lesson 6 - Touch sensor
In the next lesson we usually do a graduation. Write down your impressions about the students and the reasons why they have the grades you gave them.
- 10
- 3
- 6
- 3d_rotation 0
Level A1. Introduction. Robotics with LEGO
Introduction to robotics - The first level of the Robotics with LEGO curriculum for students in second, third or fourth grades. A journey in space, with robots. Various constructions with robots are built. Learn how to control the motors so that the robot navigates around the Sun, the Moon and Earth in various ways. Getting to know the first of the sensors. The robot can feel its surroundings with the help of the Touch sensor and avoid obstacles.
- 142
- 133:42
- 187
Lesson 6 - Touch sensor
In the next lesson we usually do a graduation. Write down your impressions about the students and the reasons why they have the grades you gave them.
- 10
- 3
- 6
- 3d_rotation 0
Robotics with LEGO - Level 1.5 - Spy games
The second level of the Robotics with LEGO curriculum for students from fifth to twelfth grades.
Students build multiple robots with thread chains and become familiar with the physical concepts of momentum and center of gravity. The concept of gears, their use and basic constructions involving gears are studied.
The new concept of "condition" is introduced in programming. Robots are becoming smarter as they can make complex decisions on their own. "Spy robots" follow their targets and avoid being noticed. This level introduces the light sensor which the robots use to recognize the colors of the objects they are looking for. Robots can stop on a black line and follow a route marked with a colored line on the floor.
The spy's most complex mission in the end of the level is to turn into a sumo wrestler and defeat any other robot in the ring.
- 56
- 12:47
- 136
Lesson 6 - Humanoid robot
In the next lesson we usually do a graduation. Write down your impressions about the students and the reasons why they have the grades you gave them.
- 5
- 5
- 10
- 3d_rotation 1
Level B2. "Military Technologies". Robotics with LEGO
The firfth level of the Robotics with LEGO curriculum for students in second, third or fourth grades.
The students build many robots with chain-treads. The Color Sensor is introduced and robots use it to recognize the colors of the objects around them. Students learn about gears, basic gear constructions, and their application. Robots now can stop on a black line and can follow a line using their sensor.
- 37
- 6:37
- 111
Lesson 6 - Line Following
In the next lesson we usually do a graduation. Write down your impressions about the students and the reasons why they have the grades you gave them.
- 5
- 3
- 9
- 3d_rotation 1
Robotics with LEGO - Level 2.0 - Robots in Factories
The third level of the Robotics with LEGO curriculum for students from fifth to twelfth grades.
Robots in this level use two or three sensors at a time and students create more complex programs for them. The work of the differential and its usage in vehicles with one drive motor is explored. Robots interact with each other and transfer information or material between themselves. Students learn in depth how to create smoother line-following programs. In the end of the workday, robots leave the conveyor belt and relax with a recreational game of volleyball.
- 44
- 15:01
- 129
Lesson 6 - Conveyor Belt
In the next lesson we usually do a graduation. Write down your impressions about the students and the reasons why they have the grades you gave them.
- 5
- 4
- 10
- 3d_rotation 2
Level C1. "Transportation". Robotics with LEGO
This is the fifth level in the Robotics with LEGO curriculum for students in third or fourth grade.
For the first time robots with steering wheels are built in this level. Those robots use one or two drive motors. The work of the differential and its usage in vehicles is explored. Students learn in-depth the working of the light sensor to create better line-following programs. The first two-wheeled motorcycle-robot is built.
- 33
- 1:03
- 110
Lesson 6 - Robotics car second version
In the next lesson we usually do a graduation. Write down your impressions about the students and the reasons why they have the grades you gave them.
- 5
- 4
- 11
- 3d_rotation 1
Robotics with LEGO - Level 2.0 - Robots in Factories
The third level of the Robotics with LEGO curriculum for students from fifth to twelfth grades.
Robots in this level use two or three sensors at a time and students create more complex programs for them. The work of the differential and its usage in vehicles with one drive motor is explored. Robots interact with each other and transfer information or material between themselves. Students learn in depth how to create smoother line-following programs. In the end of the workday, robots leave the conveyor belt and relax with a recreational game of volleyball.
- 44
- 15:01
- 129
Lesson 6 - Conveyor Belt
In the next lesson we usually do a graduation. Write down your impressions about the students and the reasons why they have the grades you gave them.
- 5
- 4
- 10
- 3d_rotation 2
Robotics with LEGO - Level 2.5 - Maritime Journey
The fourth level of the Robotics with LEGO curriculum for students from fifth to twelfth grades.
In this level students focus on the rotational sensor that is part of every motor in the robotics set. Students also learn to use the fourth sensor in the robotics set - the gyro sensor.
First few robot constructions imitate sea-animals and their behavior. Students create programs that check whether the robot's claws or pecks have successfully caught an object. That sensor in the motors allows the robots to go back in their lairs even after the use of unlimited movement. The rest of the robots are modeled after boats, yachts, and ships. With the help of the gyro sensor, students can set a course for their robots to a given angle and can detect deviations from the course. In open seas, there may be sea-monsters and the robots are being programmed to detect a sudden change in acceleration with the help of the said sensor.
- 42
- 3:52
- 133

Lesson 6 - Catching the wind
In the next lesson we usually do a graduation. Write down your impressions about the students and the reasons why they have the grades you gave them.
- 4
- 5
- 11
- 3d_rotation 1
Robotics with LEGO - Level 2.5 - Maritime Journey
The fourth level of the Robotics with LEGO curriculum for students from fifth to twelfth grades.
In this level students focus on the rotational sensor that is part of every motor in the robotics set. Students also learn to use the fourth sensor in the robotics set - the gyro sensor.
First few robot constructions imitate sea-animals and their behavior. Students create programs that check whether the robot's claws or pecks have successfully caught an object. That sensor in the motors allows the robots to go back in their lairs even after the use of unlimited movement. The rest of the robots are modeled after boats, yachts, and ships. With the help of the gyro sensor, students can set a course for their robots to a given angle and can detect deviations from the course. In open seas, there may be sea-monsters and the robots are being programmed to detect a sudden change in acceleration with the help of the said sensor.
- 42
- 3:52
- 133
Lesson 6 - Catching the wind
In the next lesson we usually do a graduation. Write down your impressions about the students and the reasons why they have the grades you gave them.
- 4
- 5
- 11
- 3d_rotation 1

Level 3.7 - Smart Robots
В много от занятията отборите работят върху един робот, като всеки отбор е отговорен за правилното реализиране на поетата от тях функционалност. Задълбочено се разглеждат задаването на входни стойности и използването на изходните стойности на всички блокове. Широко се използват променливи от трите основни типа: Integer, Boolean, Text. Роботите вече пазят богато вътрешно състояние, могат да броят, да изчисляват, да се обосновават логически, с помощта на което взимат много по-правилни решения. Въвежда се използването на паралелно изпълняващи се блокове.
- 15
- 1:03
- 111

Занятие 6 - Търсач на мини
In the next lesson we usually do a graduation. Write down your impressions about the students and the reasons why they have the grades you gave them.
- 2
- 8
- 12
- 3d_rotation 2
Level 3.7 - Smart Robots
В много от занятията отборите работят върху един робот, като всеки отбор е отговорен за правилното реализиране на поетата от тях функционалност. Задълбочено се разглеждат задаването на входни стойности и използването на изходните стойности на всички блокове. Широко се използват променливи от трите основни типа: Integer, Boolean, Text. Роботите вече пазят богато вътрешно състояние, могат да броят, да изчисляват, да се обосновават логически, с помощта на което взимат много по-правилни решения. Въвежда се използването на паралелно изпълняващи се блокове.
- 15
- 1:03
- 111
Занятие 6 - Търсач на мини
In the next lesson we usually do a graduation. Write down your impressions about the students and the reasons why they have the grades you gave them.
- 2
- 8
- 12
- 3d_rotation 2
Level A1 - Space Adventure - Robotics with LEGO SPIKE Prime
This is the first level of the LEGO Robotics Curriculum for second, third, and fourth-grade students.
A "space adventure" but with robots. Different robot structures are built in Level A1. The motors are controlled so that the robots perform precise movements around the "Earth", "Moon" and "Sun". We use the force sensor to overcome various obstacles we bump into. We learn interesting facts about the solar system and space vehicles.
- 65
- 30:30
- 76

Lesson 6 - Launching into space
In the next lesson we usually do a graduation. Write down your impressions about the students and the reasons why they have the grades you gave them.
- 7
- 4
- 9
- 3d_rotation 1

Level B1 - Carnival - Robotics with LEGO SPIKE Prime
This is the third level of the LEGO Robotics Curriculum for students in second, third, or fourth grades.
Carnival and Amusement Park Level. Each lesson has a theme related to carnivals and amusement parks. Students learn about physics concepts of inertia, center of mass, and centrifugal force. New ways of programming the force and distance sensors are introduced. We work with new concepts: forever loop, if/then, and if/else.
- 23
- 1:03
- 62

Lesson 6 - Drop Tower
In the next lesson we usually do a graduation. Write down your impressions about the students and the reasons why they have the grades you gave them.
- 3
- 4
- 10
- 3d_rotation 1
Level B1 - Carnival - Robotics with LEGO SPIKE Prime
This is the third level of the LEGO Robotics Curriculum for students in second, third, or fourth grades.
Carnival and Amusement Park Level. Each lesson has a theme related to carnivals and amusement parks. Students learn about physics concepts of inertia, center of mass, and centrifugal force. New ways of programming the force and distance sensors are introduced. We work with new concepts: forever loop, if/then, and if/else.
- 23
- 1:03
- 62
Lesson 6 - Drop Tower
In the next lesson we usually do a graduation. Write down your impressions about the students and the reasons why they have the grades you gave them.
- 3
- 4
- 10
- 3d_rotation 1

Level B2 - Introduction to Robotics Competitions - Robotics with LEGO SPIKE Prime
This is the fourth level of the LEGO Robotics Curriculum for students in second, third, or fourth grades.
Competitive Introduction Level: Each lesson has a theme related to various LEGO robotics competitions. Students learn about FIRST LEGO League, Line Following, and Sumo Wrestling. A new color sensor is introduced, and students use forever loops, wait until commands, and if/else statements in new ways.
- 21
- 1:03
- 60

Lesson 6 - Line Following Part 2
In the next lesson we usually do a graduation. Write down your impressions about the students and the reasons why they have the grades you gave them.
- 4
- 6
- 7
- 3d_rotation 2
Level A1 - Space Adventure - Robotics with LEGO SPIKE Prime
This is the first level of the LEGO Robotics Curriculum for second, third, and fourth-grade students.
A "space adventure" but with robots. Different robot structures are built in Level A1. The motors are controlled so that the robots perform precise movements around the "Earth", "Moon" and "Sun". We use the force sensor to overcome various obstacles we bump into. We learn interesting facts about the solar system and space vehicles.
- 65
- 30:30
- 76
Lesson 6 - Launching into space
In the next lesson we usually do a graduation. Write down your impressions about the students and the reasons why they have the grades you gave them.
- 7
- 4
- 9
- 3d_rotation 1
Level B2 - Introduction to Robotics Competitions - Robotics with LEGO SPIKE Prime
This is the fourth level of the LEGO Robotics Curriculum for students in second, third, or fourth grades.
Competitive Introduction Level: Each lesson has a theme related to various LEGO robotics competitions. Students learn about FIRST LEGO League, Line Following, and Sumo Wrestling. A new color sensor is introduced, and students use forever loops, wait until commands, and if/else statements in new ways.
- 21
- 1:03
- 60
Lesson 6 - Line Following Part 2
In the next lesson we usually do a graduation. Write down your impressions about the students and the reasons why they have the grades you gave them.
- 4
- 6
- 7
- 3d_rotation 2