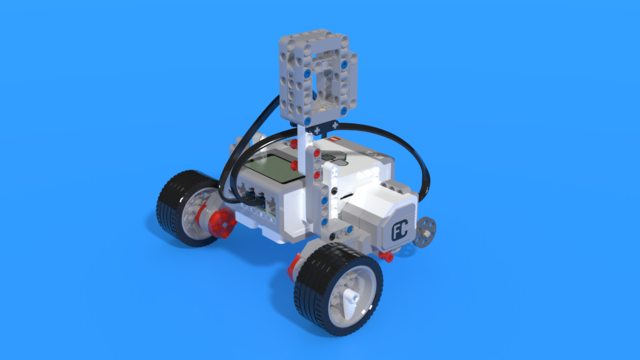
Building instructions for Catapult Robot from LEGO Mindstorms kit
Building instruction for both EV3 and NXT. The whole catapult is build in exactly 78 steps.
- #223
- 14 Dec 2014
- 1
Building instruction for both EV3 and NXT. The whole catapult is build in exactly 78 steps.
This LEGO Mindstorms Attachment has three gears, one frame and two axles. The goal of the attachment is to use the gears to change the direction in which the motion is transferred.
One LEGO gear is powering two LEGO Gears and at the end, from one motor we rotate two axles in opposite directions. Follow the building instructions.
Interesting and useful attachment for dropping a LEGO human at a specific location. It uses a lever and a gear wheel. When the lever is pressed the wheel rotates.
The attachment is constructed from LEGO Mindstorms EV3 sets.
This is a Garbage container and it is fun. As all garbage containers it has only three wheels as one of the wheels is missing. You can also see how one of the wheels is a little different and broken to the side. Like all garbage containers.
The container is useful to play and put things inside.
Suitable for children 6-10 years old. Construct the Garbage Container and leave it for a week for the children to play with. They will spend at least an hour playing with it during the week
Vex IQ robot base which could be used with different attachments. The gravity center of this robot is in the backside and it has a lot of space in front for attachments.
VEX IQ version of an Easy Bot. It's simple and appropriate for classes of students.
This LEGO attachment connects a LEGO Mindstorms EV3 Motor with a LEGO Technic Linear Actuator. The connection is through a couple of gears which makes the whole instructions quite interesting and useful as an example.
The attachment was used during FIRST LEGO League 2014 Robotics competition.
This robot is made to serve the best tea in the whole continent! It is based on the Easy Bot from EV3. As its predecessor it is based on LEGO Mindstorms EV3. It uses two large motors to move around. The best part of the robot is the cup holder, that has a cool cup that shows the KISS principle.
In all building instructions for LEGO robots it is important to have the motors attached to the brick in more than one place. In the following construction, there is a beam connecting the two motors which has exactly this purpose. It makes the construction much more stable. Try removing this beam for example and see what will happen. Would the robot be able to move?
Many different types of wheels could be used. Both NXT and EV3 or from other LEGO technic series.
This WRO robot is designed to collect a lot of ping pong balls in its container. It's built with LEGO Mindstorms EV3 45544 and 45560 sets. These are the LEGO Educational sets. The robot has two chains that collect the balls and push them into the container attachment. This is one of the larges robots we've uploaded at FLLCasts yet. You could learn a lot by following the building instructions and paying attention to the details of how this robot is built. All the alignment, all the connections. Really beautiful.
Robot for collecting ping pong balls used in the World Robotics Olympiad competitions. It is constructed with LEGO Mindstorms EV3
Robot building instructions for a World robotics Olympiad with a large container used for collecting ping-pong balls
These are building instructions for one of the greatest LEGO Mindstorms attachments that we've built. Super simple and easy to follow and at the end, you have an attachment with a rubber band that controls a lever and that could lift objects from the field. It could lift them up. Also because it is with a rubber band you don't need a motor and you could use the motor for other attachments.
Another example for a quick pinless attachment build with LEGO Mindstorms EV3 robots.
This is a very funny robotics hand with 3 fingers that you could put on your hand to "Rule the World". It's funny to control it with the touch sensors.
Instructions for building remote control. It uses the rotation sensor to determine the steering and touch sensor for handling the movement. Find building instructions for a suitable chassis here.
Together the controller and the car look like this:
Probably the simples trick for pinless attachments that we've found. It is a construction build in just three steps. Simple as that. But it has a lot of potential to teach you how to use pinless attachments. Pinless attachments are very useful during FIRST LEGO League and World Robot Olympiad competitions.