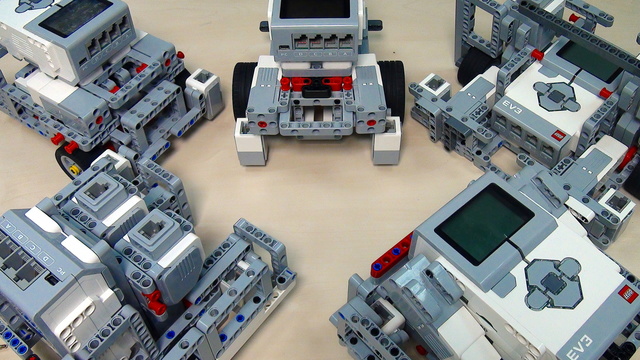
Five different robot chassis. This is the goal of the series. To present ideas for different design of the robots and especially the robot bases. If the base is stable and balanced, then in could easily be extended. Let's start with the most simple of the five.
- #183
- 24 Jan 2016
- 2:58
Some of the designs would include robots with four motors. All of the designs include sensors and preferably two of them.
Find the full course at:
Robot Design Ideas for Chassis with Mindstorms EV3
LEGO Mindstrorms EV3 Robot Base with 56mmTiresV1
Building instructions for a LEGO Mindstorms EV3 Robot Base with 56mm Tires, Version1. The robot base could be used in robotics competitions as FIRST LEGO League, World Robotics Olympiad and others

![]()
Courses with this episode
The episode is used in the following courses where you can find additional tasks for it to use in class
FIRST LEGO League Competition. Constructing and Programming a Robot Base
Try to improve the construction in the following ways:
1. Change the wheels that are used to bigger once.
2. Program the robot to move in a hexagon.
English
Building the base of your robot is sometimes the hardest thing. That's why in this series of video tutorials we'd introduce you to five new bases five new robot constructions from the Lego Mindstrorms EV3 set. Let's start with the first one.
Our goal with these constructions is again to give ideas, to comment, to explore, to discuss the different options when you are building a robot what are the advantages and disadvantages. If we start with the first robot that's the smallest robot and the smallest construction.
This one here. And what's interesting about this construction is that it requires quite a few parts so it's very very modest when it comes to needed parts for building it and it's quite small so you can use it as a starting point. It is interesting that it has 2 motors. Now, you might have 2 motors, 2 medium motors but you might also have only one of the motors and you can decide to place the motor on the left or on the right. This construction also has two sensors. Of course, it is possible that you have only one of the sensors but both of the sensors are just in front of the wheels. And this has it's advantages when it comes to following lines because the sensor is aligned to the wheel. It is interesting that the motors are quite close to each other so there is only one Lego unit as a distance between the two motors. And this makes the whole robot very very small. As some of the disadvantages for this robot is that the back wheel is not mounted very well. And I'll leave this for you as an exercise if you have this robot and you have the instructions for building this robot you can try to find ways to add this wheel at the back of the robot. Because if you just add it as an axle and we've seen this in many competitions and in many teams what happens is that when the robot moves if it stops, it might fall. The whole wheel might fall. The whole back wheel. Because of the inertia of the robot when it moves and the back wheel is detached. So, it's a nice exercise to try to fix this in a way. And you should explore different ways. Again, it's a nice construction. It's very small and it's useful as a starting point. Let's move to the next one.
Courses and lessons with this Tutorial
This Tutorial is used in the following courses and lessons
FIRST LEGO League Competition. Constructing and Programming a Robot Base
This course if used by teams, mentors and students to structure the preparation for the Robotics Game of the FIRST LEGO League Robotics Competitions. One thing that is common each year at FLL is that experience matters a lot. Our goal with this course is to quickly bring new teams up to speed with experienced teams and to share some new tricks, patterns, constructions with the more experienced teams.
- 42
- 249:53
- 10

Constructing a robot base
Five different robot chassis. This is the goal of the series. To present ideas for different design of the robots and especially the robot bases. If the base is stable and balanced, then in could easily be extended. Let's start with the most simple of the five.
- 10
- 6
- 5
- 3d_rotation 9