Днес ще ви запознаем с имената и употребата на частите в един стандартен робот.
Важно: Различаваме и разделяме частите по форма не по цвят.
Днес ще ви запознаем с имената и употребата на частите в един стандартен робот.
Важно: Различаваме и разделяме частите по форма не по цвят.
Нека се уверим, че използваме еднакви думи за частите в комплекта.
Важно: Различаваме и разделяме частите по форма не по цвят.
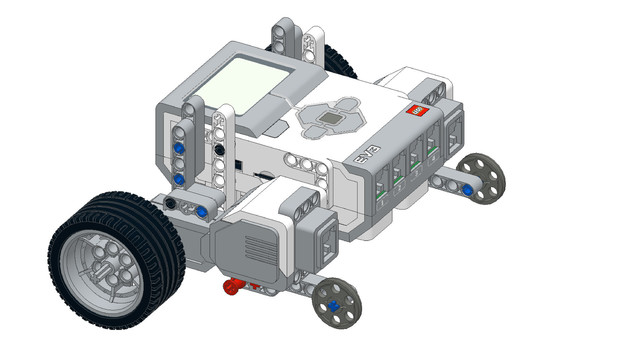
In this video we'll look at the names of some of the most common Lego parts that are used with Lego Mindstorms EV3 set.
First, let's start with the pins. There are a number of different pins in the set. First, you can see one of the most common pins. It's a black pin, also called a double pin. The idea of the pins is that you attach the pins to the beams like this. So, a pin enters into a hole of the beam. And we have a double pin. We also have a blue pin and in some of the sets you can see it again in black color. But the difference with this pin is that it's a triple pin. So, the length of this pin is three holes instead of two as was with the previous pin. So, we have the blue pin - that's a double pin. And we have the black pin - that's a double pin. And we have the blue pin - that's a triple pin. Then we also have this special blue axle pin. And if you see it in the sets you can see that one end of the pin is in one form and in the other end of the pin has a form of an axle. And it's a very useful pin for attaching to a beam to another beam where one of the holes is with an axle. And then finally the third pin that we'll use currently has a color red but I've also seen it in black, I think. Yes, in black. And we can call this and a common name for this pin is torch pin.
It has a hole and it's a cross hole. You can place different axles in this cross hole like this. And these are the four kinds of very common pins in the set. Next to the pins we also have other parts in the set that are the beams. And this here is a beam. And it has a number of holes.
This is a beam with 15 holes. We've also heard people referred to these beams like five holer because it has five holes. Or like seven holer because it has seven holes. But these are all beams. They have different color although most of the time the color is not that important with the beams. They come in light grey, in dark grey, in some red I've seen, in yellow. And these are the beams. Also there are other beams that have angles. These beams have angles. And it is sometimes referred as L beams because it looks like L. You can see it. And it has three holes by five holes. And there is also another small L beam that has two by four holes. And that's for some of the beams. We also have angler beams. We have double angler beams like this one here. And this is basically for the beams. So, these are beams and they have different holes. Some of the holes we can attach pins directly. And with other holes we can attach axles. Like this. In the EV3 set we also have rims and tires. So, we have different rims. For example, this one here, and this one here. These are two different kind of rims. And we also have tires like this. That's the tire. Now, when you add the tire to the rim, you get a wheel. Sometimes in some of the constructions, you can also use the rims as pulleys in different constructions. But that's more like a special case. Most of the time we use them just as rims and with the tires they form a wheel. The wheel has a size and you can see the size right here. So, this gives you the diameter of the wheel and from here you can do a number of calculations on how you move your robots based on the wheels that the robots use. Next, we come to two of our favorite parts in the Lego Mindstorms EV3 set. These are the parts here. First, we have this part. And it's called beam with pins because it is actually a beam and it has two holes on one side and one hole here. And we also have a number of pins - four. So four different pins. The other part is an angler beam again with pins. So it's a beam with pins. And you can use these parts along with the other beams to change the spatial orientation of the different beams. When you attach different beams to one another, most of the time you get a construction that is a plain. And to build also vertically, you must change the orientation and you can use these two parts. They are very very useful. And this is for the parts.
Този Урок е използван в следните курсове и занятия.
The things that you will be able to do with your EV3 robot by the end of this course are:
Freely move your robot towards desired target;
Avoid obstacles on the path of your robot using sensors;
Follow lines of any shape;
Detecting and picking up objects of any kind;

Overview of what is going to happen in module 3

If you are working with students and you want to introduce Robotics to your class or you want to mentor a FLL team, but you are insecure about your technical knowledge in the Robotics field, then this is the right place for you. Having in mind teachers' busy schedule, we have design two different schedules and added an option to design one just for you. FLLCasts's Mindstorms EV3 Robotics Online Training is the perfect match for any teacher.
After the completion of each task the participant has to upload his solution for verification.
Нека да разгледаме брика - LEGO Mindstorms EV3 Intelligent Brick. Умната LEGO тухличка.
EV3 брикът е главният компютър на вашия робот. Той има екран, бутони и различни портове.

Първото ниво от учебната програма по LEGO роботика за ученици от втори, трети и четвърти клас.
Едно, “пътешествие из космоса”, но с роботи. В нивото се изграждат различни конструкции на роботи. Управляват се моторите така, че роботите да извършват прецизни движения около „земята“, „луната“ и „слънцето”. Преодоляваме различни препятствия след като се блъснем в тях благодарение на сензора за допир. Изграждаме и програмираме роботи, които могат да се сражават и защитават стига това да се наложи.

Днес ще се научим как да задаваме повече от една команда на робота и ще го накараме да се движи като Йо-Йо. Някой от вас имал ли е Йо-Йо? Как се движи то? Знаехте ли, че преведено от филипински йо-йо означава „да се върне“.


Първото ниво от учебната програма по LEGO роботика за ученици от пети до дванадесети клас.
В нивото се изграждат различни конструкции на роботи. Управляват се моторите така, че роботите да извършват прецизни завои около „земята“ и „луната“. Преодоляваме различни препятствия след като се блъснем в тях благодарение на сензора за допир.
С помощта на сензора за разстояние роботът се движи без да се блъска в заобикалящите го препятствия. Достигаме до понятията цикъл, градуси, среден мотор. Накрая роботите могат да изпълняват едновременно две различни неща - докато изпълняват мисии върху специално изградено поле, третият двигател разчиства засечени обекти.
Днес ще ви запознаем с имената и употребата на частите в един стандартен робот.
Важно: Различаваме и разделяме частите по форма не по цвят.
Първото ниво от учебната програма по LEGO роботика за ученици от втори, трети и четвърти клас.
Едно, “пътешествие из космоса”, но с роботи. В нивото се изграждат различни конструкции на роботи. Управляват се моторите така, че роботите да извършват прецизни движения около „земята“, „луната“ и „слънцето”. Преодоляваме различни препятствия след като се блъснем в тях благодарение на сензора за сила. Научаваме любопитни факти за Слънчевата система и за космическите апарати.

Днес ще се запознаем с един интересен ефект предизвикан от Луната: приливните вълни. Може би знаете, че масивните тела имат притегателна сила - гравитация. Гравитацията на луната привлича водата в океаните и затова морското равнище по бреговете на океаните временно се повишава или намалява. Повишеното ниво наричаме прилив, а намаленото - отлив.
Колко мислите, че може да разликата между прилив и отлив в света?

Разстоянието между морското равнище на прилив и отлив може да достигне до 16 метра в залива Фънди в Канада, а най-ниските разлики са в Средиземно, Балтийско и Черно море, където стават само няколко сантиметра. Ние ще използваме 50 см като средна стойност, която да е удобна за задачата.