Why we change the robots all the time and what to observe in each new robot.
- #430
- 02 May 2017
- 3:28
- LEGO MINDSTORMS, LEGO MINDSTORMS EV3
- Castor Wheel, EV3, Methodology, Teacher's Note, Construction, Classes with students
New robot every day
Students get bored using the same robot in every meeting. So with each new programming concept, we introduce a new robot.
Different values for different robots
Changing the constructions from robot to robot allows the students to notice that the settings for movement and turning need to be different and they depend on the geometry of the construction. The geometry means the distance between the wheels and the size of the wheels.
Focus their attention
Each different robot allows us to observe different methods to build and connect modules of the robot. Discuss with your class about the motors, the brick, and the castor wheel. Discuss the way they are built and connected.
LEGO Mindstorms робот с метално топче (CastorBot)
Инструкции за построяването на LEGO Mindstorms EV3 робот, който наричаме CastorBot, тъй като при него се използва метално топче.
English
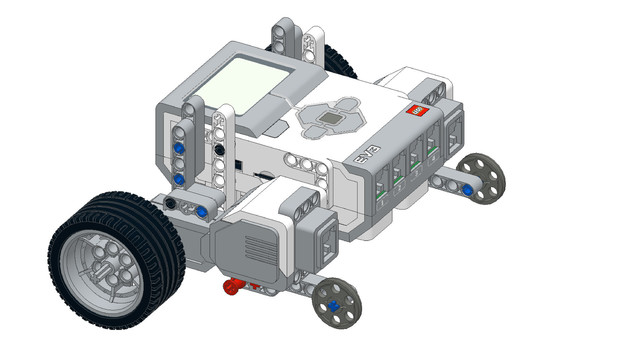
In this video we'd give a short teacher notice on using the Castor Bot and why we are building this robot. When working with beginner students they want to construct something each class. So, for every class we try to provide a new construction. It is similar to the previous one but it's different. How? In this robot we have the brick and the motors connected in a different way, positioned in a different way. We have also the distance between the wheels different for most of the robots and this will make the programs different. For example, when turning. Because they might have remembered from a previous class that you need for example 1.4 rotations to turn left but now because the robot is different this value will be different also and it will be for example 1.5 or just 1. And there are small things that change each time with the different robots and in this way the students learn. They learn the different way to construct, to connect. Also, we have the gear ball at the back which is kind of nice and easy to use. And as we noticed for the student we used these 15 hole beams here but following the instructions they will have to use 13 hole beams but we didn't have 13 so we used these ones. And that's for the Castor Bot. It's again always a good idea for the first few classes to use different instructions of different robots, so that students could learn from them. I thought that probably this needs a recap. Again, students are following the instructions and they arrive at the robots. But while following they most of the time they don't realize the different things, the different ways, the different solutions that are in each of the robots. So, it's your task, the task of the instructor to know them when you have a different way of connecting the motors it's always a good idea just to stop for a few minutes and discuss this with the students because in the more advanced class when they have to build the robots on their own what will happen is that they must have a number of tools, a number of ways to connect the motors to the brick and to realize that they could learn this. It's important for you to notice that, to help them to understand it, to see it, to discuss it, to stop for a few minutes in class just to have a short discussion about the differences in each of the robots. And again, if they change the robot while constructing it and if you come up with a different robot and if they make an interesting mistake, just take a picture or a short video and share it with us so that we can share it with all the other students and instructors at fllcasts.com.
Курсове и занятия включващи този Урок
Този Урок е използван в следните курсове и занятия.

EV3 Phi. Introduction to robotics with LEGO Mindstorms
The things that you will be able to do with your EV3 robot by the end of this course are:
Freely move your robot towards desired target;
Avoid obstacles on the path of your robot using sensors;
Follow lines of any shape;
Detecting and picking up objects of any kind;
- 92
- 220:20
- 36

Build Castor Bot
Our next robot is called CastorBot, because of the castor ball.
- 2
- 0
- 1
- 3d_rotation 0
