

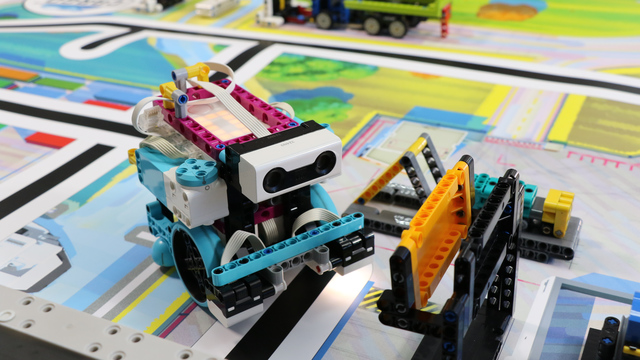
Proportional Line Following with EV3 Mindstorms. Part 3
Last part of the series. The final touch of the program makes sure that it works and is following the line with the LEGO Mindstorms EV3 Color Sensor in a smooth and fast way.
- #177
- 01 Nov 2015
Last part of the series. The final touch of the program makes sure that it works and is following the line with the LEGO Mindstorms EV3 Color Sensor in a smooth and fast way.

This video lesson is a revised version of Episode #1. Matt Gipson requested it in a comment. Using the EV3-G software we have developed a very simple program for following a line with two LEGO MINDSTORMS color/light sensors.

This video discusses the fact the robot requires a few more parts that are available in the LEGO Mindstorms EV3 robotics sets. We have a number of other constructions that require less parts, but for this particular robot construction we have decided to go beyond the standard sets, cheaply buy a few more parts and build a whole box robot with them.

In this tutorial we introduce the basic algorithm for following a line with one sensor and review the algorithm for quickly followwing a black line with one sensor, implementing both with the Mindstorms EV3 robotics kit.

In this episode we look at the way this robot is balanced. A well-balanced robot could handle heavier attachments without losing track of its position on the robotics competition field.
In this video tutorial, we demonstrate how to gently push an object to accomplish the mission. "Gently" means that we are pushing but not with force. If we push using force, the mission model will fall, and we will not accomplish the mission. We use LEGO Education SPIKE Prime and the Ultrasonic Sensor.

In this episode we build a reusable attachment for a LEGO Mindstorms EV3 robot that changes gears orientation and direction. It is one of the most useful attachments that you could use to move levers up/down and right/left. Adding the attachment on the robot takes 2-3 seconds and shows a very useful general principle of how to build reusable attachments.

The Gyro sensor can be positioned horizontally, vertically or at a random angle. Have you ever wonder what does the gyro detect when it is positioned vertically. This is the subject of this video tutorial for the LEGO Mindstorms EV3 Gyro Sensor.

With this first tutorial on the Motion Sensor in the LEGO MINDSTORMS Robot Inventor course we demonstrate the basic algorithm for moving in a straight line with the Motion Sensor. From here all the other algorithms are modifications, and if you know the basic it will be easier to tweak the behavior for your particular challenge

Pinless attachments are smart and quick and could make a big differences between two robot constructions. In this video we are sharing a nice idea for a pinless attachment placed below the robot.

This is a 10 runs tutorial that demonstrates how the accuracy of the robot improves when we use slow acceleration vs fast or default acceleration. Note that the improvement is small. This is not an accurate and consistent robot. No. This is a robot that is all but accurate or consistent. It does not use sensors and you should use sensors. But it is a teaching/demonstration moment for everybody to seen what is it that you can expect if you don't use sensors.
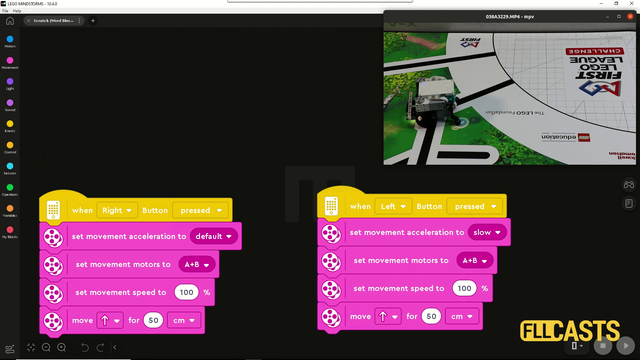
In this video tutorial we are demonstrating the impact of slow and fast acceleration on the robot. In the Scratch program there is an acceleration block for fast and slow acceleration. The robot behaves in different way. Let's explore them so that you know what to use for FIRST LEGO League competitions.

The third robot has the brick and motors placed vertically. This is quite unusual and difficult, but the construction is very powerful because it saves space.

This is a tutorial with 10 runs - 5 of them are slow and 5 of them are fast and we measure how accurate the robot is each time. How consistent is it? Can it arrive consistently on a specific location on the field without the use of the sensors? The quick answer is - No, it can not. But let's see it life

В първа част от уроците за зъбни колела ви показахме основите на системите от зъбни колела. Сега ще разгледаме системи от зъбни колела с повече от две колела и каскадни зъбни предавки.

In this video tutorial we use a LEGO MINDSTORMS Robot inventor robot and we do an experiment and a demonstration with it. We demonstrate what is the difference in the consistency and accuracy of the robot when we move slow and when we move fast. For FLL, WRO competitions there is always this balance between moving fast and moving slow.

In this video we look at the way this robot uses the LEGO Mindstorms EV3 motors. How are they attached and the what the rotation of the motor is transferred to the attachments.

This is a 10 out of 10 tutorial, demonstrating the consistency and reliability of the active attachment for switching the engine in this mission. The power is transferred through a system of gear wheels to a lever at the end. We presume that the robot is already positioned.

This video tutorial demonstrates an attachment that flips a mission model. The mission model is attached to the field, but it contains a lever. This lever must be flipped from one side to the other. There is a switch. We use a pinless active attachment with gear wheels, and you can see how this works in the tutorial. There is no use of sensors as we don't need them. We will leave the alignment and positioning for some other tutorials.

This video tutorial demonstrates the consistency and reliability of the active attachment that pushes the two mission models. The goal is to use both the attachment and the robot to push the mission model and move the truck and the plane after the blue lines.

Second active pinless attachment for the robot construction. It is placed in the top/right corner of the robot and includes an interesting gear system for transferring the power. The attachment is suitable for complete rotations.

In this video tutorial, we push two of the mission models with a pinless active attachment with gears. The goal is to push the mission models after the blue lines. This attachment is interesting as it demonstrates a non-straightforward idea of how we can push the mission models. We explain the Scratch program and how we use the motion sensors - you will learn how to turn to a specific angle by using the motion sensor.

This is a 10 out of 10 video tutorial that demonstrates the consistency and reliability of the robot that accomplishes the Unlock Cargo Plane mission. The attachment is an active attachment with gear wheels. It has a single lever constructed from 2 beans and we use this attachment to push on the mission model.

This is a third example for adding an active attachment. This third attachment is now connected to the wheel at the front of the robot. Again, the attachment could be easily extended.

In this video tutorial, we demonstrate how to release the cargo of a mission model. This mission model is an Airplane. We have to push a lever down to release it. We use an active attachment with a gear wheel.

In Episode 58 we introduced you to an LEGO Mindstorms EV3 Modular robot. Mic Lowne wrote to us and had that robot remade, because it used too many blue lego pins and could not be build using one EV3 kit.

Continuing from the last tutorial, we demonstrate the consistency and reliability of the robot when we don't user sensors. The result is pretty obvious - the robot is NOT consistent and reliable. It just makes a lot of mistakes