Each year the FIRST LEGO League robotics Competition involves loops. In this video tutorial I will go through the most common way of taking loops, show its disadvantages and suggest another way to do it.
- #47
- 14 Nov 2013
- 9:32

English
Talking about the FLL competition, we should surely mention loops. In all competitions from the past years there has been a mission that somehow involves loops. The loops are also one of our categories from the mission categorization in episode 25. So, in the next few minutes I'll show you different types of loops and also different ways for taking them.
Before we start thinking about how we can achieve missions that involve loops, we should categorize the different types of loops. First, we have regular loops which look like this. Still, they may differ. The first possible difference is their diameter, the diameter of the tubes. This loop has a smaller diameter than that loop. It can actually go through it. It's not magic. Then we have the height of the loop. As you can see, the black one is higher than the white one. Also we have a difference in the base. What does this mean? For instance, the yellow loop has a wider base and it's more stable than the white one. If you just slightly kick the white one it starts spinning and so on. Next we have objects that do not look like loops but still should be included in this category. And that's mainly because of the tubes of the objects. So, this is the pizza from the 2011 competition or the medicine mission from the 2012 mission or the loops mission like water from the 2013 competition. Here we also have a difference in the diameter. As you can see, this is different from this and from this. The last thing we should consider about loops no matter whether they are regular or not is the height of the upper part of the loop. In the case of the pizza the upper part of the loop is no more than 5 cm away from the ground. Next we have the regular loops or the medicine where we have 10-15 cm from the ground. Next we have the flexibility mission from last year where we have the upper part at 45 cm and also we could have a mission like the loops mission from 2009 where we have something like 20 to 30 cm off the ground. In conclusion, the two things that we should consider are the diameter of the loop and the height at which it is positioned. Now let's see which the most common way for taking loops is. For this purpose I'll use the pizza from the 2011 competition and also our robot. The first way is to attach a crossed axle at the appropriate height. When I run the robot, I can grab the pizza, turn around and the pizza will still be with me. The disadvantage is that if I decide to go back, the pizza will fall. A possible solution is to put something in front of the axle. Now I go and take the pizza but there's a problem. You can easily push the pizza and it may fall. So, I'll use another part. This one. I'll put it on my axle and put the axle back and try again. So, I go, take the pizza with me and when I go back (ops, I've missed it). Still, there is a slight chance that you can catch it like this. Nevertheless, I don't think this is the perfect solution we can think of. Another problem is that when using one axle only, you can easily miss the pizza. Because we aim at the middle of the pizza but if somehow the robot makes a mistake and is 2 cm on the left, it will miss the pizza. A solution is to have more than one axle. I will put these two axles. Again, I'll have to put something in front of them. Like these.
Now I have my pizza with me and when I go back, the pizza stays with me. Still, there are many flaws and a mistake can be easily made. A solution is to use some kind of a carabineer system. For instance, this one. What's the benefit of this one? It's very easy for the loop to come in but it's very difficult to come out. I can put this piece on my robot and easily take the pizza with me. Sorry, a mistake. You should have the appropriate height. Now, take the pizza with me. Right. Again, I'm using more than one axle to improve my chances for success. Another advantage of this object is that you can easily put it anywhere on the robot and you can use it no matter of the height of the loop. So, I can take the pizza with it but if I put it somewhere here on the robot, I can easily take the medicine. We used this kind of system in episode 16 where we accomplished the medicine mission using a gear construction. As we saw, it's relatively easy to take loops with this locking system. You can find building instructions for it in the materials tab below this video. When you download them, you can modify them to fit your needs. If you decide to do it, you should consider two things: the first one is the back part of the system. You can modify it so that you can attach it more easily to your robot as this really depends on the construction of your robot. The next thing is the number of axles on the base and the locking system. You can put more axles to be sure that you will take the loop. When you do that, however, you should consider the distance between any two axles. If it matches the distance between the two ends of the loop, you can easily push the loop and it may fall. In our case, when we have these axles not matching the distance between the two ends of the loop and even if we push the loop with one of the axles, the other axle still has grabbed the loop. Now we know what types of loops we can expect at FLL competitions and also we have one more solution for taking loops. Share with us your thoughts about this video and also ideas about future videos by commenting below the video or using the Help Us Improve button on the right. Thanks for watching.
Courses and lessons with this Tutorial
This Tutorial is used in the following courses and lessons
FIRST LEGO League Competition. Attachments
This course is a collection of materials for many of the attachments that we've built at FLLCasts before introducing courses. The videos were built as separate different attachments for different competitions and with the following course, we try to give it a structure.
- 60
- 347:26
- 0

Attachments
You think that you can quickly change the attachments of your LEGO Mindstorms EV3 competition robot? Are you sure? In this first episode of the series you will see how to create and attach attachments without using pins and how faster and easier this could be. You will see the design logic of a few attachments and how they work on the field.
- 5
- 0
- 0
- 3d_rotation 6

FIRST LEGO League with LEGO Education SPIKE Prime. "Challenge" competition for 9-16 years old
This is the most detailed course we've ever built on how to prepare for a FIRST LEGO League robotics competition and we've specifically focused on the use of LEGO Education SPIKE Prime as a simple Box Robot. The course consists of 25 lessons suitable for both beginner and advanced students. We build on the knowledge of 10 years of sharing example solutions with explanations for FIRST LEGO League robotics competitions.
This course is one of the popular courses in the FIRST LEGO League Robot Game. The Complete Guide. We recommend you also check out the whole guide.
- 40
- 127:22
- 24

Taking Loops with Grab Attachments
Taking/Grabbing loops is one of the most common mission types at robotics competitions like FIRST LEGO League/World Robotics Olympiad. This tutorial is about an attachment that grabs the loop. The attachment uses Luly, a small LEGO Education SPIKE Prime competition robot with 3D building instructions as a robot base.
- 2
- 0
- 1
- 3d_rotation 3

FIRST LEGO League with LEGO Mindstorms Robot Inventor. "Challenge" competition for 9-16 years old
The goal of this course is to take you through some of the most useful principles for building and using attachments to accomplish missions at FIRST LEGO League competitions. The whole course is based on a LEGO MINDSTORMS Robot Inventor and you need a single 51515 set and without additional parts (you will need a second color sensor for the lessons for using two color sensors, but feel free to skip them if you don't have it). For every mission there is a Scratch and Python program attachment. The course consists of 25 lessons suitable for beginner and advanced students. Every lessons consists of a video tutorial demonstrating the principle and how the mission could be accomplished along with building instructions for the robot, the attachment and programs for controlling the robot.
- 43
- 131:34
- 21

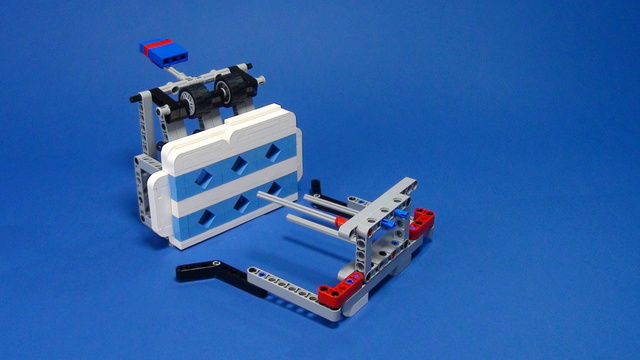
Taking Loops with Grab Attachments
This animation demonstrates the use of a Grab Attachment build from LEGO Mindstorms Robot Inventor 51515 set. Many of the FIRST LEGO League missions could be accomplished by grabbing the mission model and the principles shown here is useful for mission models that look like a loop
- 3
- 0
- 0
- 3d_rotation 3