

Box Robot Two. Push/Pull attachment with a Rack on the right side
Need to transfer circular into a linear motion. You need a rack. Here is an attachment with a rack for our box robot.
- #511
- 30 Mar 2017
Need to transfer circular into a linear motion. You need a rack. Here is an attachment with a rack for our box robot.
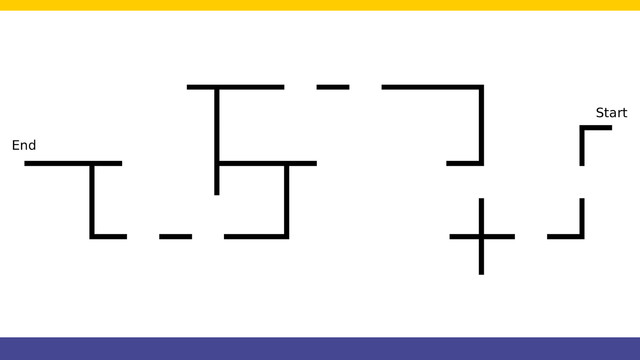
We start a course for following a line with crosses and gaps. This is a challenge that one of the users at FLLCasts.com was trying to accomplish and asked us for advice. We present the whole challenge to you step-by-step. But first, let's also see the whole run of the line following algorithm. With this course, we also do an introduction of using State Machine as a programming pattern.

The attachment builds on previous episodes this time using two LEGO rubber bands. When a lever is released the rubber band exerts pressure on it and moves it in a circular motion. As an example we are solving the 2012 FIRST LEGO League, Senior Solutions, stove mission (which was quite interesting as a mission)

This is one of the very interesting attachments by the ELM team. It is using rubber bands and some rubber to precisely drop the chicken. Very interesting way. Check it out and try to learn from it.

Based on feedback from many of you in this episode I would like to show you how to build an active attachment that changes the orientation of a gear wheel placed vertically to a gear wheel placed horizontally. This attachment could be used in competitions and shows a basic principle of changing the orientation. All attachments could follow the same principle.

In this video lesson I am building a LEGO Mindstorms EV3 active attachment powered by a small gear wheel. The attachment could move up and down, it is very useful for collecting objects. It could easily be adapted and used on other robots.
We are making a parallel with Video Lesson 56 from the series and we are also showing ways to improve the stability of an axle which is most of the time neglected, but could lead to great problems.

This robot could quite possibly be build from a single EV3 core and EV3 resource sets. It uses fewer parts and only three motors. There are additional parts that could be skipped when building the robot and we have added these parts only as to make the construction more complete.

In this Episode, we stop at the pinless attachments for the Box Robot 2 and especially for the constructing a frame. This frame is then used for further extending the robot with attachments.

Very simple and basic introduction to the color sensor in the LEGO Mindstorms EV3 set. The first program is to stop at a line. Then we can move from stoping at line to counting lines and even more complex tasks.

This video tutorial contains the final 2 programs for moving straight with a LEGO Mindstorms EV3 robot. The first program is for proportional compensation that just keeps the robot orientation straight, while the second program is for Integral compensation that returns the robot to the straight line when the robot makes a mistake.

We extract the Proportional Line Following algorithm into a new block with parameters. This allows us to experiment with the Threshold, Constant Speed and Relaxation Coefficient. You can now easily use the block in you other programs without having to implement it.

In a competition environment like the FIRST LEGO League (FLL) or World Robotics Olympiad (WRO) the color sensor is more than useful. It makes positioning on the field quite easy and precise.

Looking at the field we must first think of a strategy of solving this line following problem. There are rules that the robot must follow and these rules should be programmed in the robot.

The robot uses one middle motor. This middle motor with the use of a few gear systems controls for different axsels. We have attached wheels on this axles so it is very easy to extend the robot construction for additional LEGO Mindstorms active attachments

How do you lift heavy objects with an attachment? In this episode we show a simple, interesting, but yet not very popular way to lift something heavy with and LEGO Mindstorms EV3 robot and without gears and motors as attachment. As a specific example we are using the Strength Exercise mission from the FIRST LEGO League 2012 competition.

Use the color sensor to count the lines and stop on the third line. We do not use the wait block for this.

Based on your feedback we've build a course for introducing new students to the LEGO Mindstorms EV3 programming and construction. It is designed for school groups, competition teams and students alone in home that can get our feedback on their progress

Counting lines and stopping on the third is the subject of this video. It is important to know how to do this in order to conduct more than one experiment in STEM classes (if we consider that each line is an experiment)

The robot attachment build in this tutorial gives an idea on how to release a rubber band at a specific moment using a motor. It's a simple, but yet powerful technique on using rubber bands.

Recap on the attachments, their purpose and how you should use them.

In this video we discuss part of the pinless attachments build by the ELM team. Without pinless attachment it is nearly impossible to achieve a good score at the FIRST LEGO League competition.

This video tutorial reviews the EV3 Gyro Sensor and the HiTechnic Gyro Sensor for the LEGO Mindstorms NXT robotics Kit. We compare the two sensors and demonstrate them in action.

The program from part 3 should be refactored and improved to make it easier to understand and support. We extract most of the repeatable behaviours in a loop and this reduces the size of the program three times in terms of the number of blocks used.

In this episode we continue from Episode 55 and we improve the durability and stability of the attachment for a LEGO Mindstorms EV3 robot. Many times attachments are not very stable which results in gaps between parts. The goal of the video is to give basic construction ideas.

This is where the confusion really comes. We are keeping the robot orientation straight while the robot moves, but at the end the, robot is not at the fiinal location that we would like it to be. The robot is still about 2-3 centimeters away after moving for about a meter.

Tasks for introduction on building robots.

The 90-degree turn of the robot is different from 90-degree turn of the motor!